
Jira can be used as a Issue tracking, project management etc for your project and brigins agility with the scrum board and process. The most common use case is to create or update a Jira Ticket when there is an update on the Jenkins Job such as failure.
In this article we will see how we can install Jira and integrate with Jenkins. For the article, we will install jira with an evaluation version and then import a sample project data. Once we have a project, we will then integrate with Jenkins by creating a issue when there is Job failure.
2. We will be getting a bin extension file. Change the permission of the file using the chmod command and run the bin file as below,
[root@ip-172-31-51-99 tmp]# ./atlassian-jira-software-7.12.3-x64.bin
Unpacking JRE ...
Starting Installer ...
May 21, 2019 6:51:22 AM java.util.prefs.FileSystemPreferences$1 run
INFO: Created user preferences directory.
May 21, 2019 6:51:22 AM java.util.prefs.FileSystemPreferences$2 run
INFO: Created system preferences directory in java.home.
Fontconfig warning: ignoring UTF-8: not a valid region tag
This will install JIRA Software 7.12.3 on your computer.
OK [o, Enter], Cancel [c]
o
Choose the appropriate installation or upgrade option.
Please choose one of the following:
Express Install (use default settings) [1], Custom Install (recommended for advanced users) [2, Enter], Upgrade an existing JIRA installation [3]
2
Where should JIRA Software be installed?
[/opt/atlassian/jira]
Default location for JIRA Software data
[/var/atlassian/application-data/jira]
Configure which ports JIRA Software will use.
JIRA requires two TCP ports that are not being used by any other
applications on this machine. The HTTP port is where you will access JIRA
through your browser. The Control port is used to startup and shutdown JIRA.
Use default ports (HTTP: 8080, Control: 8005) - Recommended [1, Enter], Set custom value for HTTP and Control ports [2]
2
HTTP Port Number
[8080]
9090
Control Port Number
[8005]
9005
JIRA can be run in the background.
You may choose to run JIRA as a service, which means it will start
automatically whenever the computer restarts.
Install JIRA as Service?
Yes [y, Enter], No [n]
y
Details on where JIRA Software will be installed and the settings that will be used.
Installation Directory: /opt/atlassian/jira
Home Directory: /var/atlassian/application-data/jira
HTTP Port: 9090
RMI Port: 9005
Install as service: Yes
Install [i, Enter], Exit [e]
i
Extracting files ...
Please wait a few moments while JIRA Software is configured.
Installation of JIRA Software 7.12.3 is complete
Start JIRA Software 7.12.3 now?
Yes [y, Enter], No [n]
y
Please wait a few moments while JIRA Software starts up.
Launching JIRA Software ...
Installation of JIRA Software 7.12.3 is complete
Your installation of JIRA Software 7.12.3 is now ready and can be accessed
via your browser.
JIRA Software 7.12.3 can be accessed at http://localhost:9090
Finishing installation ...
I Have followed the custom install so that i can provide jira with different port to run. Now once jira is installed open the jira using <ip>:9090 ( in my case i have given 9090).
Once the page is opened, it will take you to the jira setup. If we choose the first one, jira will connect to the jira server with your jira account and generate the license. The database setup etc everything will be taken care by jira itself.

Choose second one, in next screen for our demo we will be using the “internal Database” When u click on that it will configure the Database by itself. Click next which will ask for the license key
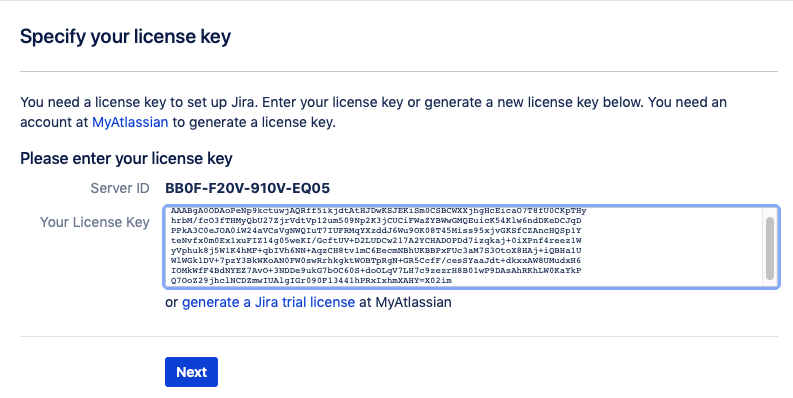
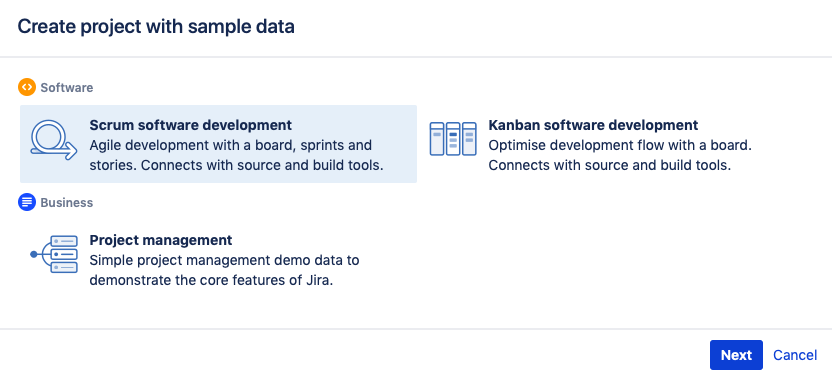
I have obtained the license key generated by logging into the my atlassian account. Next screen it will ask to configure administrator. Go with the other screen as it asks for avatar changes etc. I have chosen to use the sample data for my integration , choose Scrum software development and click next.
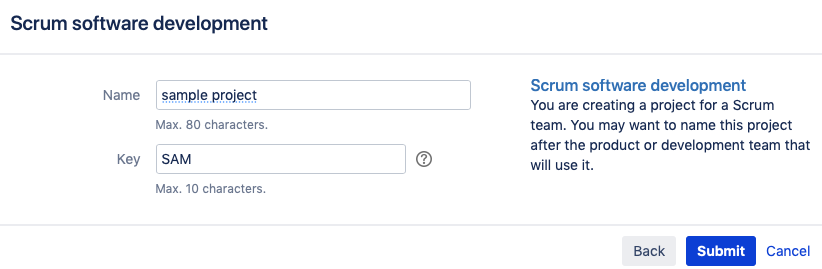
In the next page it would ask for the name and key for the project you are creating with the above sample data.
Thats it Jira is configured and integrated.
Now on the Jenkins side, Install the Jira plugin from the Manage plugins.
Next Configure System -> Configure Jira as below,

Url needs the Url of your Jira Server where it is running. Create a Credential to connect to the Jira ( the same we used to login to jira )
Now on the JOb -> Choose the Post build action as below,

The important thing is the Project key. Every project in jira will have a key and we can get the key details from Jira projects page. COnfigure the Jira project key which makes jira to create and update issues in that specific project. Run the job and once the job is failed we can see the output as ,
Build Failure
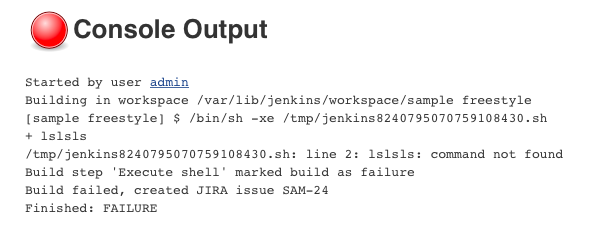
We can see that a JIRA issue SAM-24 is created by Jenkins itself. If we go to jira and see SAM-24, we can find additional details as below,

Very Informative blog. Keep Sharing more..
ReplyDeleteJira Tutorial
I appreciate your detailed guide on installing and integrating Jira with Jenkins. This step-by-step tutorial makes the process much easier to follow, especially for those new to these tools. Your explanation of configuring Jira and setting up the integration is clear and helpful. It's a valuable resource for anyone looking to streamline their project management and issue tracking processes. Great job sharing your knowledge!
ReplyDelete