Pages

Wednesday, February 19, 2020

Amazon Workdocs

Amazon WorkDocs is a fully managed, secure enterprise storage and sharing service with strong administrative controls and feedback capabilities that improve user productivity.


Create the Workdocs,

We will be receiving a email to our registered email account with instructions on accessing the account. 


Amazon WorkDocs is a fully managed, secure content creation, storage, and collaboration service. With Amazon WorkDocs, you can easily create, edit, and share content, and because it’s stored centrally on AWS, access it from anywhere on any device.


WorkDocs provides tons of features which is needed by any Document Management System within the enterprise. Most notably are User Management, Sharing, Editing, Encryption, Workflow, Feedback, Compliances, etc.


Click the “Open admin Console” to invite the users that can share the files. We can also upload the files for sharing. 


Workdoc apps:
WorkDocs provides some standard companion applications through which users can access the files offline, edit or share them from their devices.


Workdoc SDK:
So far all features are manually configured and there is no automation or external service involved. But we can extend WorkDocs with SDK provided by the AWS
Read More

Tuesday, February 18, 2020

Amazon Workspaces

As organizations increase in operating globally and continue to merge and acquire, they are looking for IT to match this dynamic environment. The traditional work hours are not being used, BYOD ( Bring Your Own Device ) is increasing at workplaces. The traditional workday timings are not 9-5 anymore. Employees connect to the office on weekends and even on holidays these days. It is also increasing using different types of devices to access office networks. With these multiple devices, how can we make sure security threads and compliance won't be a major concern?.  

Most of the time, application teams login to a dedicated desktop to run their code and perform multiple operations. Most of these desktops are virtual desktops that provide employees with full access from multiple devices like home PC, mobile or other device. 

A virtual desktop means that a user's desktop environment ( data,applications etc) is stored remotely on a server. Desktop virtualization software separates the desktop operating systems, applications and data from the hardware client, storing this “virtual desktop” on a remote server. From an IT perspective, virtual desktops help reduce the time it takes to provision new desktops, and they also help to decrease desktop management and support costs. The virtual desktops in an organization are created using VMvare, Citrix and On premises VDI solutions. The problem with the on premises solutions are that they need a huge upfront investments, maintenance of the backend hardware , infrastructure and software components.  Having the desktops data on a centralized location, it is very hard to handle a outage. An outage or a corruption can cause issues multiple users and may take time to get back the desktops. This is where Amazon Workspace come into the picture. 

Amazon Workspace is a fully managed, traditional, full-desktop service in the AWS cloud. The basic idea behind Workspace is to access your desktop from any where, anytime and from any device. Workspace enable you to create virtual, cloud based desktops which can be anything from microsoft to linux. These desktops are called workspaces. We don't need to have seperate hardware of install software which is a huge benefit and also cut costs. AWS handles patching and management of the desktop environment and has a very cost-effective pay-as-you-go model which can be hourly or monthly


Click on the Quick Setup -> Launch
CHoose a Bundle in the next screen,

Also provide the users to login,


WorkSpaces may take up to 20 minutes to become available. Instructions will be sent to the user on how to connect to their WorkSpace. After refreshing for some time, i can see the Workspace is in an Available state.

We will be receiving an Email with all instructions on how to get started with the workspace. There will be a link to set the credentials for the workspace like password,
In the next screen,it will ask you to download the workspace client.  Enter the registration code as below provided in email.

In the next screen,it will ask for user name and password. Enter those details as below,
Once we login, we can see the below windows 10 desktop,
Read More

Elastic Block Storage ( EBS )

Amazon EBS is like a Hard drive in the cloud that provides Persistent block storage volumes for use with Amazon Ec2 Instances. The volumes that we create can be attached to your Ec2 Instance and allows one to create a file system on the top of those volumes. The volumes attached or mounted on to a Ec2 instance can be used to store data, run a database server or use them in any other way.

Amazon Ebs provides 5 types of volumes,
General Purpose SSD ( gp2 ) : If you need a balance of both performance and price, this is the one to choose. this is the default volume that gets attached to the Ec2 instance. SSD stands for Solid state Drive which is multiple times faster than HDD ( Hard Disk drive ). this is a very good type for performing small input/output operations. Having this SSD volume as your root volume will increase the Ec2 performance. 

These Ebs Volumes provide a ratio of 3 IOPS per GB with the ability to burst up to 3000 IOPS for extended period of time. They support unto 10000 IOPS and 160MB/s of throughput. 1 IOPS operations is equal to 256KB/s of read or write operation.

Provisioned IOPS SSD (io1) : This type if the fastest and most expensive Eps volumes. They are designed for High I/O intensive applications like Large Relational or NoSql Databases. The Size of this volume ranges from 4 GB to 16GB and IOPS range from 100 IOPS to 32000 IOPS.

Throughput Optimised HDD (st1) : This a low cost magnetic Storage volume which define performance in terms of throughput. These are designed for large, sequential workloads like Big data, log processing etc.

Cold HDD ( sc1 ) : These are even cheaper magnetic storage than the Throughput optimised. They are for large sequential cold workloads like file server. These are good for infrequently accessed workloads. 

Magnetic : They are previous generation magnetic drives that are suited for workloads that are infrequently accessed.

Creating a EBS volume and attaching to the Ec2 Instance
Go to volumes -> Elastic Block Storage -> Ec2 Instance

Click on Create. Once the Ebs volume is created. Go to volumes and attach the volume to an Instance. Attach the volume as,
If we can see the volume is attached on device as /dev/sdf. Now once the volume is attached,it does not mean it is available to use. We have to first perform certain steps to use the volume. Check the volume mounted,

Check if the volume has any data using the following command.
[root@ip-200-0-1-59 html]# sudo file -s /dev/xvdf
/dev/xvdf: data

If the above command output shows “/dev/xvdf: data”, it means your volume is empty.

Format the file system,
[root@ip-200-0-1-59 html]# sudo mkfs -t ext4 /dev/xvdf
mke2fs 1.42.9 (28-Dec-2013)
Filesystem label=
OS type: Linux
Block size=4096 (log=2)
Fragment size=4096 (log=2)
Stride=0 blocks, Stripe width=0 blocks
65536 inodes, 262144 blocks
13107 blocks (5.00%) reserved for the super user
First data block=0
Maximum filesystem blocks=268435456
8 block groups
32768 blocks per group, 32768 fragments per group
8192 inodes per group
Superblock backups stored on blocks:
    32768, 98304, 163840, 229376

Allocating group tables: done                        
Writing inode tables: done                        
Creating journal (8192 blocks): done
Writing superblocks and filesystem accounting information: done

Create a directory of your choice to mount our new ext4 volume. I am using the name “newvolume”
sudo mkdir /newvolume

Mount the volume
sudo mount /dev/xvdf /newvolume/

Now we can use the volume. To unmount the volume, you have to use the following command. umount /dev/xvdf.
Read More

Friday, February 7, 2020

Under standing Aws Load Balancer

Load Balancing refers to efficiently distributing incoming network traffic across a group of backend servers. The group of servers are called server farm or server pool. Most popular load balancers include nginx, mod_jk with apache httpd. Installing a load balancer is quite easy with some configuration. Most of the time, these load balancers are used when there is heavy access from users to an application. One can replace the existing infrastructure with bigger ones which are not too economical. Another way is to use a smaller multiple infrastructure, run the application in those infrastructure and 

Aws on the other hand provides a load balancer to make our applications high available by distributing traffic across multiple instances and traffic is routed based on the health checks performed on the server farm.

The application load balancer works on application layer ( layer 7) or Transport Layer ( Layer 4) of the OSI model. Requests are passed to the backend server farm based on the information inside the HTTP requests header. It is also possible to modify the HTTP headers that contain X-forwarded-for field containing the client IP address. So whenever there is a request from the user, the request goes to the load balancer and then the request is held, load balancer create pool of connections already to the backend server farm and by using one of the connections from the pool, the original request is forwarded to the backend instances and same goes while sending data to the user. 

The requests are observed by the load balancer and based on the port and protocol, the request is forwarded to backed server farm and this forwarding happens only to the healthy instance identified by the load balancer.
Aws provides different types of load balancers,
Classic Load Balancer
Application Load Balancer
Network Load Balancer

Let's talk about each of them in detail,
Classic Load Balancer - These load balancers distribute upcoming traffic to different Ec2 instances in multiple availability Zones. The Classic load balancer is a connection-based balancer where requests are forwarded by the load balancer without “looking into” any of these requests. They just forward to the backend section. Another feature with these is that a new instances can be added to the existing instances without disrupting the flow of requests. This load balancer works on both request level as well as the connection level. 
The classic load balancer (CLB) operates at the Transport Layer ( Layer 4) of the OST model which means the load balancer routes traffic between clients to servers based on the IP address and TCP port. 

Though it is possible to have a single server behind a Load balancer, it is best to have a pool of servers behind the load balancer. The server farm running backed can be running in multiple Availability Zones within a region to support high availability. With this case if one Az is unavailable, the load balancer can route traffic to other Az’s.

There are few cases of load imbalance from classic load balancer with the default configuration of classic load balancer and if there are an uneven number of servers in the backend. It is recommended to maintain an equal number of target instances in each Availability Zone.

Application Load Balancer - With the classic load balancer, we cannot enable content-based routing or path based routing. Aws came up with the Application load balancer that does these. ALB is a fully managed, scalable and highly available load balancing platform. 

This Load balanced is basically implemented for Web applications with HTTP and HTTPS protocols. With this, content and path based routings are enabled thus allowing requests to be routed to different applications behind a single load balancer.

We can add up to 10 different applications behind a single Application Load Balancer ( ALB ) with a Path based routing feature. Another advantage is that has native support for micro services and container based architectures. Another advantage with the ALB over CLB is that CLB can be used with one port at a time, where as ALB supports multiple ports.

Host Based Routing : let's say we have 2 web sites “jagadish.com”  and “jagadish.admin.com”. Both of these websites are hosted on two Ec2 instances. Now if we want to route requests coming from different users to these different websites, we can create using ALB. this is not possible using the CLB.

Path Based Routing : Similarly when we have a single website with 2 different paths like “jagadish.com/blog” and “jagadish.com/page” and want requests to be routed, an ALB can be used here which is not possible by CLB.

Network Based Balancer ( NLB) -The Network load balancer on the other hand operates on the network layer of the OSI model. One of the main advantages of using NLB is during the sudden spikes in the application access.

Let's say we have an application running on multiple Ec2 instances and ALB is used to route traffic. Now another feature is launched in the application and traffic is increased with millions of requests. In this case ALB may not be able to handle the sudden spike in traffic. This is where NLB comes into the picture. NLB has the capability to handle a sudden spike in traffic since it works at the connection level. Since it works at the connection level, it is capable of handling millions of requests per second securely while maintaining ultra low latencies.
  • NLB Provides the Support for static IP addresses for the load balancer.
  • Provides support for registering targets by IP address which includes target outside the VPC for the Load Balancer.
  • Provides support for monitoring the health of each service independently.

Monitoring Load Balancer - Since Load Balancer are managed services, we don't have a way to login to them by ssh and see what's happening. We can use CloudWatch Metrics & Alerts and also access logs for monitoring load balancers.

Metrics like “HealthyHostCount”, “Latency” and “Rejected Connection Count” can be monitored to understand how Load balancer is working.

Load Balancer logs are generated every 5 minutes and stored in S3. We will pay the s3 expenses but we won't pay for data transfer to the S3. Access logs don't not guarantee that every request will be written to that.Some records may be missing and Amazon does warn that “Elastic Load Balancing logs requests on a best-effort basis.”

in the next article, we will see a demo on how to use the Load Balancer in Aws.
Read More

Thursday, February 6, 2020

Storing secrets Using Aws Secrets Manager

Secrets are very commonly used in applications. A secret can be a password to connect to a database, an application ID or a token. Many of the times application teams write code using credentials to connect to the database. These credentials can be either plain or obtained from another file. Since security is becoming very important, what if we have a way to store these credentials in a location and access them while running our application in a secure way. I save the credentials like user name and password , associate a token to this credential and use that token in the application for connecting to the database. The location is called Valut in some cases. Aws provides us with a similar facility called Secrets manager.

In this article we will see how we can create secrets and access them from our application code,


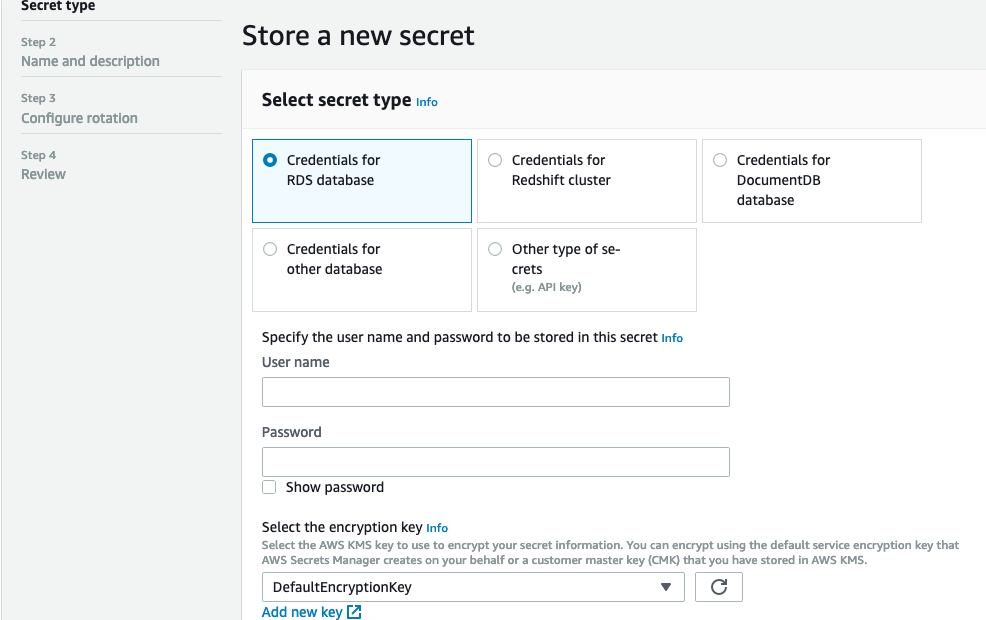
Go to the Aws Services and search for Secrets Manager. On the Home screen, we can see a Create Secret button. Click on it and we will go to this page where we can create secrets. 

We can see that we have multiple options for creating secrets. We havev
Credentials for RDS database
Credentials for Redshift
Credentials for DocumentDB
Credentials for Other Databases
Other type of secrets

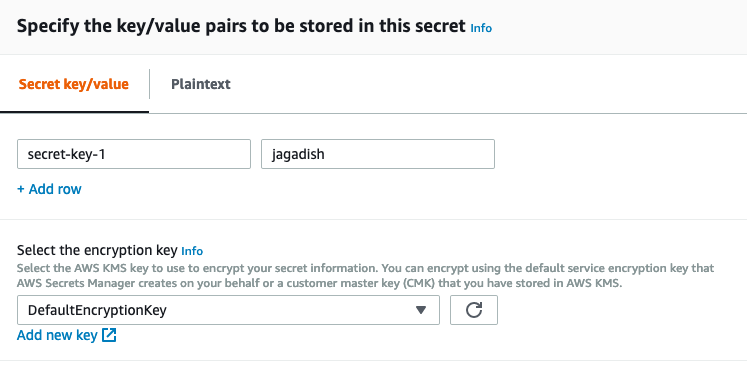
For this demo, i have chosen the “other type of secrets” and created a secret as below,
I am selecting the Default Encryption Key for this purpose. In the next screen,
We have to provide the name of the secret that we will use for retrieving in the code. I gave it the name “sample-key”. Now using this secret name,I will try to retrieve the secrets created.

In the next screen we can see the auto key rotation policy. Save the Secret. We can then run the sample boto python code as below,
jagadishm@[/Volumes/Work/aws/code]: cat access-secret-from-secretmanager.py 
import boto3
import base64
from botocore.exceptions import ClientError


def get_secret():

    secret_name = "sample-key"
    region_name = "eu-west-1"

    # Create a Secrets Manager client
    session = boto3.session.Session()
    client = session.client(
        service_name='secretsmanager',
        region_name='eu-west-1'
    )

    try:
        get_secret_value_response = client.get_secret_value(
            SecretId=secret_name
        )
    except ClientError as e:
        if e.response['Error']['Code'] == 'DecryptionFailureException':
            # Secrets Manager can't decrypt the protected secret text using the provided KMS key.
            # Deal with the exception here, and/or rethrow at your discretion.
            raise e
        elif e.response['Error']['Code'] == 'InternalServiceErrorException':
            # An error occurred on the server side.
            # Deal with the exception here, and/or rethrow at your discretion.
            raise e
        elif e.response['Error']['Code'] == 'InvalidParameterException':
            # You provided an invalid value for a parameter.
            # Deal with the exception here, and/or rethrow at your discretion.
            raise e
        elif e.response['Error']['Code'] == 'InvalidRequestException':
            # You provided a parameter value that is not valid for the current state of the resource.
            # Deal with the exception here, and/or rethrow at your discretion.
            raise e
        elif e.response['Error']['Code'] == 'ResourceNotFoundException':
            # We can't find the resource that you asked for.
            # Deal with the exception here, and/or rethrow at your discretion.
            raise e
    else:
        if 'SecretString' in get_secret_value_response:
            secret = get_secret_value_response['SecretString']
            print(secret)
        else:
            decoded_binary_secret = base64.b64decode(get_secret_value_response['SecretBinary'])
            print(decoded_binary_secret)
  
if __name__ == "__main__":
    get_secret()

Once we run the code, we can see the output as below,
jagadishm@[/Volumes/Work/aws/code]: python access-secret-from-secretmanager.py 
{"secret-key-1":"jagadish"}

How can our code running in Ec2 instance can access the secrets?
Now the very important thing is how can code running in the ec2 instances access the secrets from the secrets manager. This is where roles come into picture. 
1. Go to Services -> IAM -> Roles → Create Role.
2. Select the type of trusted entity as an AWS service
3. Select EC2
4. Hit Next- Permissions.
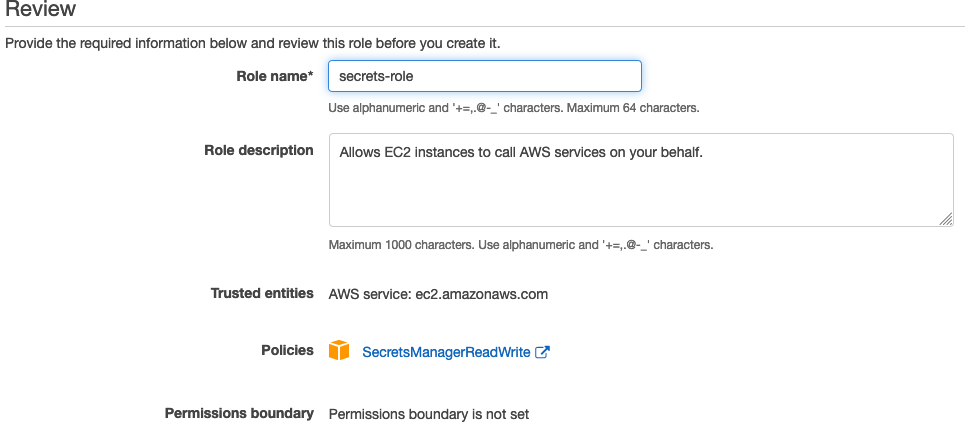
5. Search for the permission policy "SecretsManagerReadWrite" and select.
6. Hit Next-Tags.
7. Add tags if you need hit Next.
8. Give a role name and hit Create Role.
Once the role is created, go to the instance -> Actions and add role to that. Once you add the role and run the code, we can see the secrets created.
Read More