
We Use CloudFormation for building our Infrastructure and other Aws Services. Our Developers write a lot of CloudFormation template code for various operations and automation. As a part of this, we have to come up with an automation approval process for the Cloudformation template code that we write.
As a part of the process, we identified a couple of tools for validating the cloudformation templates. We designed an approval process for the our code that we write. We will be using the standard cloudformation templates for our testing process. Please check out the public source code from here
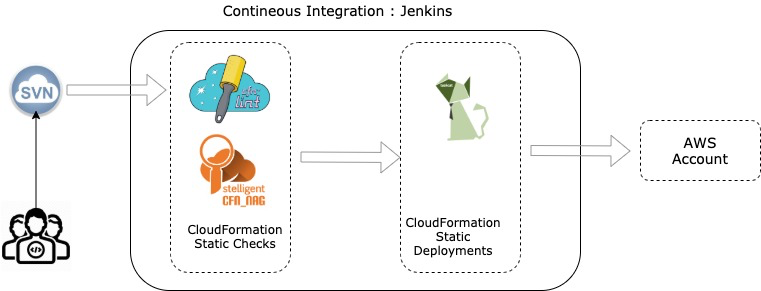
Liniting : Lint or linter is a tool that analyzes source code to flag programming errors , bugs, stylistic errors and suspicious constructs. Linting is important to reduce errors and improve the overall quality of your code. Using lint tools can help you accelerate development and reduce costs by finding errors earlier. The tool that we use here is the “cft-lint”
Cft-lint is a python based cft template validation tool. Though Cloud formation provides a validate command to analyze the template, cft-lint provides additional checks. It validates the CFT json/yaml templates against the cloudformation specs which includes checking valid values for resource properties and best practices.
The tool is rule based. Predefined rules are available to start with where our cft templates are validated with those rules. We can add our own custom rules tool.
Installation : Installing cft-lint is quite easy, all we need is python pip tool for installing the package as below,
[root@ip-172-31-32-147]#pip install setuptools --upgrade
[root@ip-172-31-32-147]#pip install cfn-lint
A simple check with
[root@ip-172-31-32-147]# cfn-lint volume.yml
W3010 Don't hardcode us-east-1a for AvailabilityZones
Volume.yml:10:7
[root@ip-172-31-32-147]# cfn-lint single_security_group.json
E3002 Property is an object instead of List at Resources/sg/Properties/SecurityGroupIngress
Single_security_group.json:7:9
[root@ip-172-31-32-147 example-cfn_nag]# cfn-lint stack.yml
E3012 Property Resources/EC2SecurityGroup/Properties/SecurityGroupEgress/0/IpProtocol should be of type String
stack.yml:62:15
The rules can be pre configured and most of the stylistic and hardcode values etc are validated in this linting tool.
Static Analysis tools : Static analysis tools refer to a wide array of tools that examine source code, executables, or even documentation, to find problems before they happen; without actually running the code. The code is not executed but checked thoroughly. The tool we use here is “cfg_nag”.
Cfg_nag is a ruby based tool that parses a collection of CFT templates and applies rules to find code patterns that could lead to insecure infrastructure. The results of the tool include the logical resource identifiers for violating resources and an explanation of what rule has been violated. This tool is also a rule based tool where preconfigured rules are available and custom can be built.
While there are quite a number of particular rules the tool will attempt to match, the rough categories are:
IAM and resource policies (S3 Bucket, SQS, etc.) : Matches policies that are overly permissive in some way (e.g. wildcards in actions or principles)
Security Group ingress and egress rules : Matches rules that are overly liberal (e.g. an ingress rule open to 0.0.0.0/0, port range 1-65535 is open)
Access Logs : Looks for access logs that are not enabled for applicable resources (e.g. Elastic Load Balancers and CloudFront Distributions)
Encryption : (Server-side) encryption that is not enabled or enforced for applicable resources (e.g. EBS volumes or for PutObject calls on an S3 bucket)
All the rules are considered either warnings or failures. Any discovered failures will result in a non-zero exit code, while warnings will not.
Installation : Installing this tool will take a few more steps as this tool is based on Ruby. We have to install ruby and then install the cfg_nag tool. Below are steps to perform those,
[root@ip-172-31-32-147]# yum install gcc-c++ patch readline readline-devel zlib zlib-devel libffi-devel openssl-devel make bzip2 autoconf automake libtool bison sqlite-devel
[root@ip-172-31-32-147]# curl -sSL https://rvm.io/mpapis.asc | gpg2 --import -
[root@ip-172-31-32-147]# curl -sSL https://rvm.io/pkuczynski.asc | gpg2 --import -
[root@ip-172-31-32-147]# curl -L get.rvm.io | bash -s stable
[root@ip-172-31-32-147]# source /etc/profile.d/rvm.sh
[root@ip-172-31-32-147]# rvm reload
RVM reloaded!
[root@ip-172-31-32-147]# rvm install 2.7
[root@ip-172-31-32-147]# gem install cfn-nag
Once the Installation is done,a simple scan on a cft template shows the results as,
[root@ip-172-31-32-147]# cfn_nag_scan --input-path single_security_group.json
------------------------------------------------------------
single_security_group.json
------------------------------------------------------------------------------------------------------------------------
| FAIL F1000
|
| Resources: ["sg"]
| Line Numbers: [4]
|
| Missing egress rule means all traffic is allowed outbound. Make this explicit if it is desired configuration
------------------------------------------------------------
| WARN W36
|
| Resources: ["sg"]
| Line Numbers: [4]
|
| Security group rules without a description obscure their purpose and may lead to bad practices in ensuring they only allow traffic from the ports and sources/destinations required.
Another example shows,
[root@ip-172-31-32-147]# cfn_nag_scan --input-path volume.yml
------------------------------------------------------------
volume.yml
------------------------------------------------------------------------------------------------------------------------
| WARN W37
|
| Resources: ["EBSVolume"]
| Line Numbers: [7]
|
| EBS Volume should specify a KmsKeyId value
------------------------------------------------------------
| FAIL F1
|
| Resources: ["EBSVolume"]
| Line Numbers: [7]
|
| EBS volume should have server-side encryption enabled
Failures count: 1
Warnings count: 1
[root@ip-172-31-32-147]# cfn_nag_scan --input-path base-vpc-example.template.yml
------------------------------------------------------------
base-vpc-example.template.yml
------------------------------------------------------------------------------------------------------------------------
| WARN W60
|
| Resources: ["VPC"]
| Line Numbers: [14]
|
| VPC should have a flow log attached
Failures count: 0
Warnings count: 1
The rules that are not needed can be excluded.
Testing the CloudFormation templates : Once the CFT templates are cleared with the linting and static analysis checking and come up with a good score, we then move to the testing phases. The Tool used for testing cloudformation templates is “TaskCat”.
Installation : Installing the taskcat is quite easy.
[root@ip-172-31-32-147]# yum install python36.x86_64
[root@ip-172-31-32-147]# pip3 install virtualenv
[root@ip-172-31-32-147]# Pip install virtualenv
[root@ip-172-31-32-147]# virtualenv -p /usr/bin/python3.6 vpy36
[root@ip-172-31-32-147]# source vpy36/bin/activate
[root@ip-172-31-32-147]# pip install taskcat
TaskCat : As we write more and more code, we also need to make sure to test them once if they are running correctly. We also need to validate if the correct parameters are passed to the Templates for successful execution of the stack. As a part of this, the CFT templates should go through a mandatory automated testing process and the tool we use here is TaskCat.
TaskCat deploys your AWS CloudFormation template in multiple AWS Regions and generates a report with a pass/fail grade for each region. You can specify the regions and number of Availability Zones you want to include in the test, and pass in parameter values from your AWS CloudFormation template.
TaskCat handles
- Uses a parameters file to pass input parameters to CreateStack.
- Uses runtime injection to dynamically generate stack inputs.
- Collects logs from the CloudFormation stack (including nested stacks).
- Cleans up stacks and staging assets.
- Generates test reports for every requested test region.
A Simple TaskCat example include,
---
AWSTemplateFormatVersion: '2010-09-09'
Description: Creates an SQS Queue.
Resources:
MyQueue:
Type: AWS::SQS::Queue
Properties:
QueueName:
Fn::Join:
- ''
- - SampleQueue-
- Ref: AWS::StackName
Outputs:
MyQueueARN:
Value:
Ref: MyQueue
A CFT YML file for creating a SQS Queue. The testing file looks as,
[root@ip-172-31-19-104 taskcat-example]# cat .taskcat.yml
project:
name: taskcat-example
regions:
- us-east-1
- us-east-2
tests:
sqs-test:
template: ./sqs.yml
In the above test case, I am trying to run the sqs.yml file on multiple regions including us-east-1 and us-east-2. Running the taskcat is quite easy calling “taskcat test run”. Once it runs successfully we can see the results as,
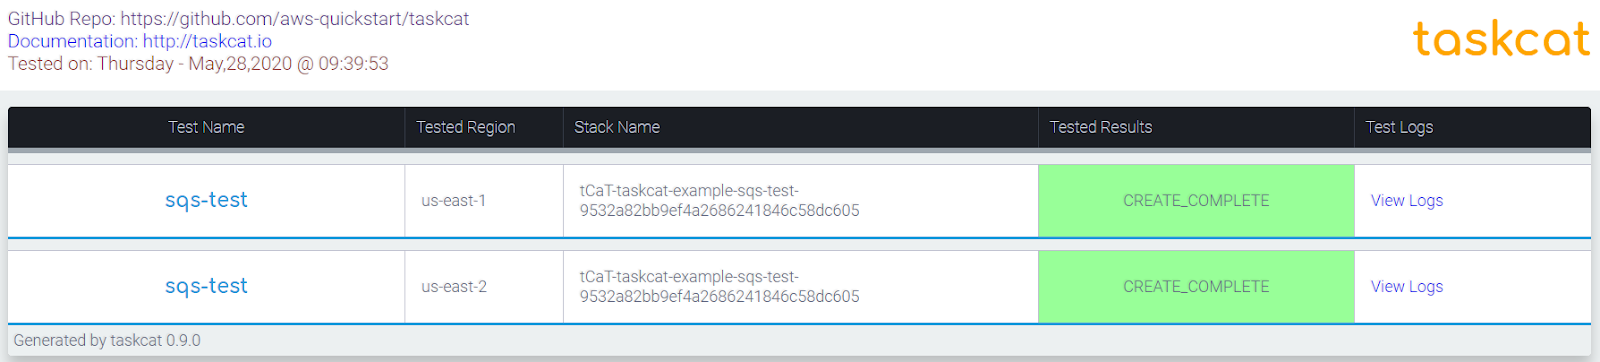
Click on logs beside the Regions and we can see details logs

The Jenkins Pipeline will include all the 3 phases for testing our CFT templates for Governance and security. The results will be available with the Dev Repo. Once the code is successfully linted , static analyzed and testing we move it the prod Repo.


