Pages

Showing posts with label vagrant. Show all posts

Monday, August 8, 2016

Using Ansible Vault in Vagrant

While using ansible with vagrant, there are cases where we need to run Ansible manually when  we use Ansible vault. Now vagrant provides facilities in allowing vagrant use Ansible vault when starting the remote machine.

We can make vagrant to ask for the Ansible vault password while starting the remote machine by passing the Ansible raw arguments.

Check the vagrantfile below,

[root@puppet sshkeys]# cat Vagrantfile
Vagrant.configure(2) do |config|
   config.vm.box = "geerlingguy/centos7"
   config.vm.host_name = "sshdev.foohost.vm"

   config.vm.provider :virtualbox do |vb|
       vb.name = "SSHFooBarhost" #Name of the Virtual
       vb.customize ["modifyvm", :id , "--cpus", 4]
   end

 config.vm.provision “Ansible” do |ansible|
    ansible.playbook =  “playbook.yml”
    Ansible.raw_arguments = “ –ask-vault-pass”
 end

end

The above snippet will allow vagrant to ask for the vault password when using Ansible playbook which has the vault configuration.

More to come , Happy learning J


Read More

Vagrant auto SSH Keys

There are many cases where when we configure the vagrant machine we also need to push the ssh keys to the newly created machine. While using Ansible, the ping command works only when the ssh keys are available on the remote machine.

Vagrant does provide ways to copy the ssh keys from host machine to the remote machine (guest) when creating them.

Add the below content to the Vagrantfile as

if File.exists?(File.join(Dir.home, ".ssh" , "id_rsa.pub"))
     ssh_key= File.read(File.join(Dir.home, ".ssh","id_rsa.pub"))
  
      config.vm.provision :shell, :inline =>"
          echo 'Copying Local Ssh Keys to the VM For Provisioning'
          mkdir -p /home/vagrant/.ssh
          chmod -R 750 /home/vagrant/.ssh
          echo '#{ssh_key}' >> /home/vagrant/.ssh/authorized_keys && chmod -R 644 /home/vagrant/.ssh/authorized_keys          
           ", privileged: false
  else
      raise Vagrant::Errors::VagrantError, "\n SSH keys Not Found"
  end

The whole vagrantfile looks as ,

[root@puppet sshkeys]# cat Vagrantfile
Vagrant.configure(2) do |config|
   config.vm.box = "geerlingguy/centos7"
   config.vm.host_name = "sshdev.foohost.vm"

   config.vm.provider :virtualbox do |vb|
       vb.name = "SSHFooBarhost" #Name of the Virtual
       vb.customize ["modifyvm", :id , "--cpus", 4]
   end

   if File.exists?(File.join(Dir.home, ".ssh" , "id_rsa.pub"))
      ssh_key= File.read(File.join(Dir.home, ".ssh","id_rsa.pub"))
     
           config.vm.provision :shell, :inline =>"
           echo 'Copying Local Ssh Keys to the VM For Provisioning'
           mkdir -p /home/vagrant/.ssh
           chmod -R 750 /home/vagrant/.ssh
           echo '#{ssh_key}' >> /home/vagrant/.ssh/authorized_keys && chmod -R 644 /home/vagrant/.ssh/authorized_keys          
           ", privileged: false
  else
      raise Vagrant::Errors::VagrantError, "\n SSH keys Not Found"
  end

end

Upon running the “vagrant up” ,it not only starts the guest machine but also provisions us with the ssh keys of the host machine to the guest machine.


More to Come. Happy learning J
Read More

Saturday, December 26, 2015

Vagrant – Custom Box

In the previous article we have seen how we can download a base Box from the internet and use that to configure new Virtuals but there will be cases where we need to clone a existing box and create new ones out of them. Vagrant provides options for closing a existing box for creating a new one.

1) Creating a new box from the existing one using ,

[root@vx111a CentOsVagrant]# vagrant package --base barhost --output centnew.box
==> barhost: Attempting graceful shutdown of VM...
    barhost: Guest communication could not be established! This is usually because
    barhost: SSH is not running, the authentication information was changed,
    barhost: or some other networking issue. Vagrant will force halt, if
    barhost: capable.
==> barhost: Forcing shutdown of VM...
==> barhost: Clearing any previously set forwarded ports...
==> barhost: Exporting VM...
==> barhost: Compressing package to: /work/CentOsVagrant/centnew.box

2) Once the new box is created with the name centnew.box, Copy this file to a new directory and add the box with name CentiOS

[root@vx111a vagrantTest]# vagrant box add CentiOS centnew.box
==> box: Box file was not detected as metadata. Adding it directly...
==> box: Adding box 'CentiOS' (v0) for provider:
    box: Unpacking necessary files from: file:///work/vagrantTest/centnew.box
==> box: Successfully added box 'CentiOS' (v0) for 'virtualbox'!

3) Once the box is added ,we can check that using the “vagrant box list” command
[root@vx111a vagrantTest]# vagrant box list
CentOS    (virtualbox, 0)
CentiOS   (virtualbox, 0)
mynewBox  (virtualbox, 0)
precise32 (virtualbox, 0)

4) Once the box is added successfully , use the “vagrant init” command and then make the necessary changes to the file for the new virtual to be configured.

[root@vx111a vagrantTest]# cat Vagrantfile
Vagrant.configure(2) do |config|
  config.vm.box = "CentiOS"
  config.vm.host_name = "dev1.puppetlabs.vm"
config.vm.provider :virtualbox do |vb|
     vb.name = "foohost"
     vb.cpus = 2
end
end


5) From the same location, run the “vagrant up” for starting the virtual with the new box. Once started we can see the virtual available in the Oracle Virtual Box


Read More

Vagrant – Provisioning

Provisioning is some thing like providing. In Infrastructure ,a provisioning is some thing like preparing the Server or the Physical machine with all necessary configuration and installations before passing it to the Users. Vagrant provides a good support for the Provisioning the virtuals while configuration. In this article we will see how we can provision a virtual with necessary configuration.

We will be using a Sample Shell Script which will run after the creation of the virtual is done. The creation and running the script are done in sequence. The commands that use inside the script will be run inside the virtual once the creation is complete.

1) The Shell Script -  installPuppet.sh
This is the basic shell script which will install Puppet packages into the newly created virtuals. The script looks some thing like this,

[root@vx111a CentOsVagrant]# cat installPuppet.sh
#!/usr/bin/env bash
# This bootstraps Puppet on CentOS 6.x
# It has been tested on CentOS 6.3 64bit

set -e

REPO_URL="https://yum.puppetlabs.com/el/6/products/x86_64/puppetlabs-release-6-11.noarch.rpm"

if [ "$EUID" -ne "0" ]; then
  echo "This script must be run as root." >&2
  exit 1
fi

if which puppet > /dev/null 2>&1; then
  echo "Puppet is already installed"
  exit 0
fi

# Install puppet labs repo
echo "Configuring PuppetLabs repo..."
repo_path=$(mktemp)
wget --output-document=${repo_path} ${REPO_URL} 2>/dev/null
rpm -i ${repo_path} >/dev/null

# Install Puppet...
echo "Installing puppet"
yum install -y puppet > /dev/null

echo "Puppet installed!"

2) Now create the Vagrant file in a directory using the “vagrant init” command. Once file is created, change the contents like below,

[root@vx111a CentOsVagrant]# cat Vagrantfile
Vagrant.configure(2) do |config|
  config.vm.box = "CentOS"
  config.vm.box_url = "https://saleseng.s3.amazonaws.com/boxfiles/CentOS-6.3-x86_64-minimal.box"
  config.vm.host_name = "dev.puppetlabs.vm"
  config.vm.network "private_network", type: "dhcp"
  config.vm.network "forwarded_port", guest: 80, host: 8084
  config.vm.provision :shell, :path => "installPuppet.sh"

config.vm.provider :virtualbox do |vb|
     vb.name = "barhost"
end
end

If you check the above configuration, we see that we added some more parameters.

1) Vm Name

config.vm.provider :virtualbox do |vb|
     vb.name = "barhost"
     vb.cpus = 2
     vb.customize [“modifyvm”,:id,”- -memory”,”1024”
end

Using the above one, we will set the name of the virtual configured to “barhost”. We are also setting the number of Cpu’s that virtual should get by default.

A default memory of 1GB is allocated to the new Virtaul that is being created.

2) Port forwarding - if you have a web server inside the virtual machine listening on port 80, then it can be accessed from the host machine on port 8931, for example by typing localhost:8931 in your browser. This is some thing like Port ford warding available in Virtual and this can be obtained by adding this line

config.vm.network :forwarded_port, guest: 80, host: 8931, auto_correct: true

The auto_correct option set to true tells Vagrant to handle port collisions automatically. There are cases when you have multiple vagrant boxes running with the same port open on the host machine, in these cases Vagrant will automatically resolve the conflicting ports.

3) Public Network – Network is one area where Vagrant is very simple to configure. Vagrant does the network configuration by means of high level configuration settings. Vagrant does provide 2 types of networks

Private network means that each machine will get private ip address from the private address space and machines will be able to communicate with one to another via these addresses

public network allow access to the machine where as private networks will never allow the general public.

In the above configuration file we have defined a private network and dhcp is used to assign an IP address from the private network space.

We can also use an IP address to configure the network using public as,
config.vm.network "public_network", ip: "172.16.200.192"
 
4) The last line is the provisioning script location and telling the Vagrant to use the script to provision the virtual once configured.

config.vm.provision :shell, :path => "installPuppet.sh"

The script is located in the same directory and will be used to configure the virtuals with the steps that we defined in the script.

5) Now run the “vagrant up” command ,

[root@vx111a CentOsVagrant]# vagrant up
Bringing machine 'default' up with 'virtualbox' provider...
==> default: Importing base box 'CentOS'...
==> default: Matching MAC address for NAT networking...
==> default: Setting the name of the VM: barhost
==> default: Fixed port collision for 22 => 2222. Now on port 2200.
==> default: Clearing any previously set network interfaces...
==> default: Available bridged network interfaces:
1) em1
2) vmnet8
3) virbr0
4) vmnet1
==> default: When choosing an interface, it is usually the one that is
==> default: being used to connect to the internet.
    default: Which interface should the network bridge to? 1
==> default: Preparing network interfaces based on configuration...
    default: Adapter 1: nat
    default: Adapter 2: bridged
==> default: Forwarding ports...
    default: 80 => 8084 (adapter 1)
    default: 22 => 2200 (adapter 1)
==> default: Booting VM...
==> default: Waiting for machine to boot. This may take a few minutes...
    default: SSH address: 127.0.0.1:2200
    default: SSH username: vagrant
    default: SSH auth method: private key
    default: Warning: Connection timeout. Retrying...
    default:
    default: Vagrant insecure key detected. Vagrant will automatically replace
    default: this with a newly generated keypair for better security.
    default:
    default: Inserting generated public key within guest...
    default: Removing insecure key from the guest if it's present...
    default: Key inserted! Disconnecting and reconnecting using new SSH key...
==> default: Machine booted and ready!
==> default: Checking for guest additions in VM...
    default: The guest additions on this VM do not match the installed version of
    default: VirtualBox! In most cases this is fine, but in rare cases it can
    default: prevent things such as shared folders from working properly. If you see
    default: shared folder errors, please make sure the guest additions within the
    default: virtual machine match the version of VirtualBox you have installed on
    default: your host and reload your VM.
    default:
    default: Guest Additions Version: 4.1.18
    default: VirtualBox Version: 5.0
==> default: Setting hostname...
==> default: Configuring and enabling network interfaces...
==> default: Mounting shared folders...
    default: /vagrant => /work/CentOsVagrant
==> default: Running provisioner: shell...
    default: Running: /tmp/vagrant-shell20151222-18898-u8qsod.sh
==> default: Puppet installed

Now  if we check the output , we can see the provisioning script is ran once the virtual is configured. The message “puppet installed” can be seen at last.


6) We can see the virtual with the name “barhost” available in Oracle virtual box


Read More

Vagrant Configurations – in Detail

In the previous article we have seen how we can configure vagrant boxes. In this article we will see how we can configure vagrant box in details along with understating the vagrant file.

1) The first thing in creating a Vagrant virtual is to run the init command. Run the “vagrant init” command which will place a Vagrantfile in the current directory. This is the configuration file that will be used in configuring the vagrant virtual box. This file contains the name , URL for the box that needs to be downloaded from, Poft forwarding , sync folder details , networking etc.

[root@vx111a CentOsVagrant]# vagrant init
A `Vagrantfile` has been placed in this directory. You are now
ready to `vagrant up` your first virtual environment! Please read
the comments in the Vagrantfile as well as documentation on
`vagrantup.com` for more information on using Vagrant.

[root@vx111a CentOsVagrant]# ll
total 4
-rw-r--r--. 1 root root 3016 Dec  2 14:35 Vagrantfile

2) Once the file is created, open the file and change the basic properties to create the vagrant box. Clear the contents of the file and use the basic configuration steps defined below as,

Vagrant.configure(2) do |config|
  config.vm.box = "CentOS"
  config.vm.box_url = "https://saleseng.s3.amazonaws.com/boxfiles/CentOS-6.3-x86_64-minimal.box"
  config.vm.host_name = "dev.puppetlabs.vm"
end

The configuration steps are,

1) Vagrant uses API versions while defining the configuration Steps. This was set for the backward compatibility. So we will start the configuration file by defining the vagrant version. This current version is 2 so we define,

Vagrant.configure(2) do |config|
*****
end

2) The next line tells us about the type of the box we will use . We named the box as “CentOs”. You can define your own if you need

config.vm.box = "CentOS"

3) The next line to define the Box URL from where we will download the Image file for the virtual we are trying to build.
 config.vm.box_url = "https://saleseng.s3.amazonaws.com/boxfiles/CentOS-6.3-x86_64-minimal.box"

The above one says that it is a CentOs box with minimal configuration.

4) The next step is define the host name of the Virtual configured. This is some thing called as provisioning since we are defining a box for the virtual that has yet to be created.

  config.vm.host_name = "dev.puppetlabs.vm"

5) Once the Configuration is done, save it and run the “vagrant up” command “vagrant up”.

[root@vx111a CentOsVagrant]# vagrant up
Bringing machine 'default' up with 'virtualbox' provider...
==> default: Importing base box 'CentOS'...
==> default: Matching MAC address for NAT networking...
==> default: Setting the name of the VM: barhost
==> default: Fixed port collision for 22 => 2222. Now on port 2200.
==> default: Clearing any previously set network interfaces...
==> default: Available bridged network interfaces:
1) em1
2) vmnet8
3) virbr0
4) vmnet1
==> default: When choosing an interface, it is usually the one that is
==> default: being used to connect to the internet.
    default: Which interface should the network bridge to? 1
==> default: Preparing network interfaces based on configuration...
    default: Adapter 1: nat
    default: Adapter 2: bridged
==> default: Forwarding ports...
    default: 80 => 8084 (adapter 1)
    default: 22 => 2200 (adapter 1)
==> default: Booting VM...
==> default: Waiting for machine to boot. This may take a few minutes...
    default: SSH address: 127.0.0.1:2200
    default: SSH username: vagrant
    default: SSH auth method: private key
    default: Warning: Connection timeout. Retrying...
    default:
    default: Vagrant insecure key detected. Vagrant will automatically replace
    default: this with a newly generated keypair for better security.
    default:
    default: Inserting generated public key within guest...
    default: Removing insecure key from the guest if it's present...
    default: Key inserted! Disconnecting and reconnecting using new SSH key...
==> default: Machine booted and ready!
==> default: Checking for guest additions in VM...
    default: The guest additions on this VM do not match the installed version of
    default: VirtualBox! In most cases this is fine, but in rare cases it can
    default: prevent things such as shared folders from working properly. If you see
    default: shared folder errors, please make sure the guest additions within the
    default: virtual machine match the version of VirtualBox you have installed on
    default: your host and reload your VM.
    default:
    default: Guest Additions Version: 4.1.18
    default: VirtualBox Version: 5.0
==> default: Setting hostname...
==> default: Configuring and enabling network interfaces...
==> default: Mounting shared folders...
    default: /vagrant => /work/CentOsVagrant

6) Once the Virtaul is up and running , check the “vagrant box list” command to make sure the box is added and also check the Virtual box to see whether the newly created virtuals is shown in Oracle Virtual box.

More to Come, happy learning
Read More

Vagrant Boxes

From the previous article, we have seen how we can configure a Virtual box. But in most cases building a virtual machine from scratch which is somewhat slow and time consuming, it is advisable to add the box image which helps people to clone other virtuals using that image. These base images are known as boxes in Vagrant. Boxes are added to Vagrant with command “vagrant box add”. This stores the box under a specific name so that multiple Vagrant environments can re-use it. In this article we will see how we can add a box before creating that

 [root@vx111a vagt]# vagrant box add precise32 http://files.vagrantup.com/precise32.box
==> box: Box file was not detected as metadata. Adding it directly...
==> box: Adding box 'precise32' (v0) for provider:
    box: Downloading: http://files.vagrantup.com/precise32.box
==> box: Successfully added box 'precise32' (v0) for 'virtualbox'!

Now the box for the Precise32 has been added. Check the box list to see whether the Precise32 is available or now.

[root@vx111a vagt]# vagrant box list
precise32 (virtualbox, 0)

Read More

Vagrant – First Box

This article will help in configuring the first box using vagrant. The first thing in creating a Virtual box is to choose a Operating system that we want to run. Now for the demo purpose we will choose the precise32 box from hashiCorp. This is a standard Ubuntu 12.04 LTS 64-bit box.

1) Run the “vagrant init” command along with the name of the box and location of the Box like this

[root@vx111a vagt]# vagrant init precise32 http://files.vagrantup.com/precise32.box
A `Vagrantfile` has been placed in this directory. You are now
ready to `vagrant up` your first virtual environment! Please read
the comments in the Vagrantfile as well as documentation on
`vagrantup.com` for more information on using Vagrant.

2) Once the command is run, a Vagrant file is created with the below contents.

Vagrant.configure(2) do |config|
  config.vm.box = "precise32"
  config.vm.box_url = "http://files.vagrantup.com/precise32.box"
end

Though there are many other commented lines, we can clean them to see the above contents. We got the vm.box name and box.url from where we need to download the box.

3) Run the “vagrant box list” to see the available boxes

[root@vx111a vagt]# vagrant box list
CentOS    (virtualbox, 0)
CentiOS   (virtualbox, 0)
mynewBox  (virtualbox, 0)

We can see that the recently added Precise32 is not available.

4) Now the next step is to start the Precise32 box. We use the “vagrant up” command from the same location as the vagrantfile exits

[root@vx111a vagt]# vagrant up
Bringing machine 'default' up with 'virtualbox' provider...
==> default: Importing base box 'precise32'...
==> default: Matching MAC address for NAT networking...
==> default: Setting the name of the VM: vagt_default_1450767047168_69849
==> default: Clearing any previously set network interfaces...
==> default: Preparing network interfaces based on configuration...
    default: Adapter 1: nat
==> default: Forwarding ports...
    default: 22 => 2222 (adapter 1)
==> default: Booting VM...
==> default: Waiting for machine to boot. This may take a few minutes...
    default: SSH address: 127.0.0.1:2222
    default: SSH username: vagrant
    default: SSH auth method: private key
    default: Warning: Connection timeout. Retrying...
    default:
    default: Vagrant insecure key detected. Vagrant will automatically replace
    default: this with a newly generated keypair for better security.
    default:
    default: Inserting generated public key within guest...
    default: Removing insecure key from the guest if it's present...
    default: Key inserted! Disconnecting and reconnecting using new SSH key...
==> default: Machine booted and ready!
==> default: Checking for guest additions in VM...
    default: The guest additions on this VM do not match the installed version of
    default: VirtualBox! In most cases this is fine, but in rare cases it can
    default: prevent things such as shared folders from working properly. If you see
    default: shared folder errors, please make sure the guest additions within the
    default: virtual machine match the version of VirtualBox you have installed on
    default: your host and reload your VM.
    default:
    default: Guest Additions Version: 4.2.0
    default: VirtualBox Version: 5.0
==> default: Mounting shared folders...
    default: /vagrant => /test/vagt

This will take some time in downloading the Precise32 copy to the local host and making the necessary configurations and starting that up.

5) Once the vagrant up is done, we can run the “vagrant box list” to see the newly added box as

[root@vx111a vagt]# vagrant box list
CentOS    (virtualbox, 0)
CentiOS   (virtualbox, 0)
mynewBox  (virtualbox, 0)
precise32 (virtualbox, 0)

6) One command is available in vagrant “vagrant global-status” which will give you more details about the running virtuals like,

[root@vx111a vagt]# vagrant global-status
id       name    provider   state    directory                        
-------------------------------------------------------------------------
468eb28  default virtualbox poweroff /work/hello                      
9ebdb6a  default virtualbox running  /work/CentOsVagrant              
ddb41f9  default virtualbox running  /work/vagrantTest                
1af9161  default virtualbox running  /test/vagt                       

We can see the last line which is the newly created one. This also gives us the directory location from where the virtual machine was running.

7) Checking the newly created virtual. Vagrant does provide the ssh capabilities for the newly created virtual box. We can use the “vagrant ssh” command to login to the newly created machine as,

[root@vx111a vagt]# vagrant ssh
Welcome to Ubuntu 12.04 LTS (GNU/Linux 3.2.0-23-generic-pae i686)

 * Documentation:  https://help.ubuntu.com/
New release '14.04.3 LTS' available.
Run 'do-release-upgrade' to upgrade to it.

Welcome to your Vagrant-built virtual machine.
Last login: Tue Dec 22 07:05:22 2015 from 10.0.2.2

Check the Release version as,
vagrant@precise32:~$ cat /etc/lsb-release
DISTRIB_ID=Ubuntu
DISTRIB_RELEASE=12.04
DISTRIB_CODENAME=precise
DISTRIB_DESCRIPTION="Ubuntu 12.04 LTS"

Check the User Logged in using,
vagrant@precise32:~$ id
uid=1000(vagrant) gid=1000(vagrant) groups=1000(vagrant),4(adm),24(cdrom),27(sudo),30(dip),46(plugdev),109(lpadmin),110(sambashare),999(admin)

Change the Root Password using,

vagrant@precise32:~$ sudo passwd
Enter new UNIX password:
Retype new UNIX password:
passwd: password updated successfully

vagrant@precise32:~$ su root
Password:
root@precise32:/home/vagrant# id
uid=0(root) gid=0(root) groups=0(root)

we can use the “exit” command for getting out of the box.
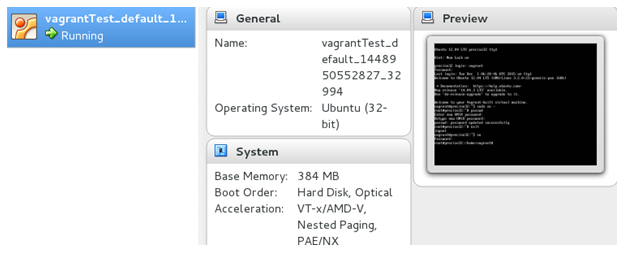
8) Now if we open the Oracle Virtual box we can see a New Virtual Box running. Right click on the box and choose “show” to login to the GUI of the newly Creating Virtual Box
 9) Removing the Virtaul Box Configured – Now if we want to remove the virtual box that is created we can use the,

[root@vx111a vagt]# vagrant box remove precise32
Removing box 'precise32' (v0) with provider 'virtualbox'...

By this we complete the basic configuration of the vagrant box. In the next articles we will see more ways of using vagrant
Read More

Vagrant – Basics

Vagrant is an Open Source tool for building and managing virtualized development environments. In other words vagrant is used to create Virtual machines. A virtual machine is a software implementation of a computer, running a complete operating system stack on a virtualizer. Virtuals configured by Vagrant are hosted on Oracle virtual Box which is a virtualizer and open source provided by Oracle.

The virtual machine is generally a full implementation of the Computer with a Disk, memory and CPU. The machine running the virtualizer is the Host system. The virtual machine running on the virtualizer is the Guest system. As far as the Guest operating system is concerned, it is running on real hardware. From the perspective of the Host, all of the Guest's resources are used by the virtualizer program. A Box, or base image, is the prepackaged virtual machine that Vagrant will manage.

In other words, vagrant is used to Create and configure lightweight, reproducible, and portable development environments. This article will tell you on how to configure the Vagrant Virtuals and basic usage of them.

1) Installing vagrant
Vagrant can be downloaded from here. Choose the packages based on your Operating system and download them.

2) Once downloaded as an RPM for *nix based OS, run the yum command for installing the vagrant. Once installed, run the

[root@vx111a Downloads]# vagrant -v
Vagrant 1.7.4

We can see the commands available with vagrant using

[root@vx111a ~]# vagrant list-commands
Below is a listing of all available Vagrant commands and a brief description of what they do.

box
 manages boxes installation, removal, etc.
connect
 connect to a remotely shared Vagrant environment
destroy
 stops and deletes all traces of the vagrant machine
docker-logs
 outputs the logs from the Docker container
docker-run
 run a one-off command in the context of a container
global-status
 outputs status Vagrant environments for this user
halt
 stops the vagrant machine
help
 shows the help for a subcommand
init
 initializes a new Vagrant environment by creating a Vagrantfile
list-commands
 outputs all available Vagrant subcommands, even non-primary ones
login
 log in to HashiCorp's Atlas
package
 packages a running vagrant environment into a box
plugin
 manages plugins install, uninstall, update, etc.
provision
 provisions the vagrant machine
push
 deploys code in this environment to a configured destination
rdp
 connects to machine via RDP
reload
 restarts vagrant machine, loads new Vagrantfile configuration
resume
 resume a suspended vagrant machine
rsync
 syncs rsync synced folders to remote machine
rsync-auto
 syncs rsync synced folders automatically when files change
share
 share your Vagrant environment with anyone in the world
ssh
 connects to machine via SSH
ssh-config
 outputs OpenSSH valid configuration to connect to the machine
status
 outputs status of the vagrant machine
suspend
 suspends the machine
up
 starts and provisions the vagrant environment
version
 prints current and latest Vagrant version

Terminology of Vagrant
Before starting with the vagrant we need to understand few basic terms of vagrant.

Providers – these are the components that enable vagrant to use a different virtulization. That is as said above we will be using the oracle virtual Box while working with vagrant. Oracle virtual box is one vagrant supported software hypervisor. Vagrant supports other hypervisors too like Hyper-V. Additional Providers can also be added by plugin mechanism. For example you can add support for VMWare products as well as IaaS providers such as AWS

Provisioners – These allows vagrant to bring machine to a desired state. This can be done by executing simple shell scripts or a different configuration management tools such as puppet and Check. Provisioning in Vagrant usually happens after machine initialization but can be initiated on demand.

boxes – a Box in vagrant is a package that are bundled with provider specific machine data. That is considering a CentOs box which contains Centos operatins system and certain modifications. These boxes are used in creating similar vagrant virtual machines by importing them.

Vagrant plugins – Plugin in Vagrant provides extendability via its plugins API. This creates possibilities to add support for new provisioners, providers and other utilities

We can use the command “vagrant plugin list” to see the available plugins.
Shared/Synced folders – Vagrant allows sharing or syncing of folders from host machine to guest machine. This allows you to edit your files locally and see the changes in the guest machine. This is based on the provider for example virtual Box provides the shared folder mechanism. Vagrant also allows syncing by using tools such as rsync or network file share using NFS.

Port forwarding – This is one of the important feature that used with networking in vagrant.
Some providers such as VirtualBox allow running VMs in NAT network mode. In this mode the VM sits in its own private address space which is not accessible from the host machine. In this case port forwarding allows creating forwarding rules that will forward traffic from local port to the port of the virtual machine.

Hope this helps in understanding the basic concepts of Vagrant. In the next article we will see how to set our first vagrant machine.
Read More