We will be creating a 2 node kubernetes cluster in which we have a master and a node.The Machine details include
10.131.175.138 - Master Node
172.16.202.96 - Worker Node
Configuration on Master Node
Set the Hostname for the master node as ‘k8s-master’
hostnamectl set-hostname ‘k8s-master’
Disable Selinux
setenforce 0
sed -i --follow-symlinks 's/SELINUX=enforcing/SELINUX=disabled/g' /etc/sysconfig/selinux
Configure the Firewall rules
firewall-cmd --permanent --add-port=6443/tcp
firewall-cmd --permanent --add-port=2379-2380/tcp
firewall-cmd --permanent --add-port=10250/tcp
firewall-cmd --permanent --add-port=10251/tcp
firewall-cmd --permanent --add-port=10252/tcp
firewall-cmd --permanent --add-port=10255/tcp
firewall-cmd --reload
Set the bridge-nf-call-iptables to 1
modprobe br_netfilter
echo "1" > /proc/sys/net/bridge/bridge-nf-call-iptables
These control whether or not packets traversing the bridge are sent to iptables for processing
Disable the Swap
use the command , swapoff -a
Why are we disabling swap? Swapping results in moving data to and fro from memory. The idea
of kubernetes is that all deployments should be pinned with the actual memory/Cpu limits.
Swapping a pod details can result in slowness.
of kubernetes is that all deployments should be pinned with the actual memory/Cpu limits.
Swapping a pod details can result in slowness.
Configure the Kubernetes Yum Repo
Create a kubernetes.repo file under /etc/yum.repos.d/ with the below contents,
[kubernetes]
name=Kubernetes
baseurl=https://packages.cloud.google.com/yum/repos/kubernetes-el7-x86_64
enabled=1
gpgcheck=1
repo_gpgcheck=1
gpgkey=https://packages.cloud.google.com/yum/doc/yum-key.gpg
https://packages.cloud.google.com/yum/doc/rpm-package-key.gpg
Install , Enable & Start Docker and kubeadm
yum install kubeadm docker -y
systemctl restart docker && systemctl enable docker
systemctl restart kubelet && systemctl enable kubelet
Initialize the Kubernetes Master by kubeadm
Run the “kubeadm init” command to initialize the kubernetes master , if all goes well will be seeing an output similar to the below
Your Kubernetes master has initialized successfully!
To start using your cluster, you need to run the following as a regular user:
mkdir -p $HOME/.kube
sudo cp -i /etc/kubernetes/admin.conf $HOME/.kube/config
sudo chown $(id -u):$(id -g) $HOME/.kube/config
You should now deploy a pod network to the cluster.
Run "kubectl apply -f [podnetwork].yaml" with one of the options listed at:
https://kubernetes.io/docs/concepts/cluster-administration/addons/
You can now join any number of machines by running the following on each node
as root:
kubeadm join 10.131.175.138:6443 --token pe7y1r.zk9u6c07g2nlwm3h --discovery-token-ca-cert-hash sha256:48dfb2c9eda08aaed84a70011221804c80adcd700e73d870fd12d041b0054641
Save the contents of this output since we will be using in connecting the worker nodes with the master node.
Configure the cluster to use as Root user
Once the master is up and running , we then need to configure our cluster to be used by root user. Execute the commands ,
mkdir -p $HOME/.kube
cp -i /etc/kubernetes/admin.conf $HOME/.kube/config
chown $(id -u):$(id -g) $HOME/.kube/config
Once the commands are executed , get the pod list using the Kubectl command as,

We will be seeing all pods running in the current cluster. Once Pod “dns” is still in pending.

If we get the node list even, we see that the master is still in “NotReady” state. We need to get the Master to ready state and also the dns pod to running state. We need to deploy the pod network so that containers in other hosts communicate with each other. POD network is the overlay network between worker nodes.
Note - An overlay network is a telecommunications network that is built on top of another network and is supported by its infrastructure. An overlay network decouples network services from the underlying infrastructure by encapsulating one packet inside of another packet.
The network must be deployed before any application. Kube-dns is a internal helper service will not startup before a network is installed. Several projects provide kubernetes pod networks using CNI ( Container network interface ) and we will be using one from the weave cloud
Run the below commands to get the Pod Network running and master to ready state,
export kubever=$(kubectl version | base64 | tr -d '\n')
kubectl apply -f "https://cloud.weave.works/k8s/net?k8s-version=$kubever"
Once we execute the above commands , we see that there are couple of service accounts being created. If all goes well and we run the get pods commands as,
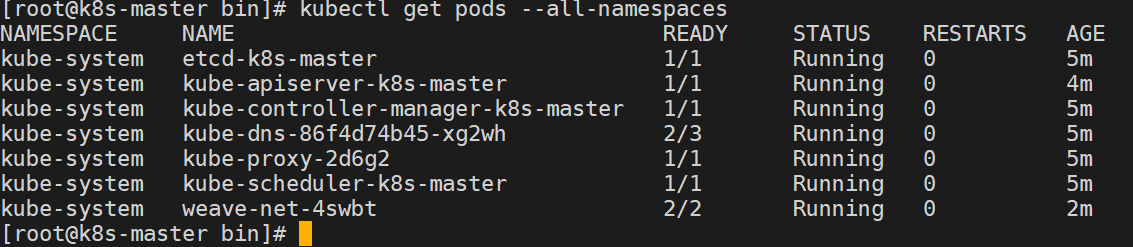
We will be able to see all the Pods running and also the master in Ready State.
[root@manja17-I13330 ~]# kubectl get nodes
NAME STATUS ROLES AGE VERSION
manja17-i13330 Ready master 1d v1.10.1
Now that all are up and running we are done with our master. We need to configure the worker node. In the next article we will see how to configure the nodes.

No comments :
Post a Comment