
Containers are a type of Operating System Virtualization that runs applications along with all its dependencies in a resource isolated process. Container have come a long way in *nix based Operating Systems. There are many container runtimes available for running containers in Linux. Running Containers on Windows is a requirement that's been added recently
Docker came up with an installation package for windows that helps in running windows containers but the way containers run in windows is quite different from containers running on linux. In 2016, Microsoft partnered with Docker to come up with the Docker specification that supports running Docker windows containers. Not all Windows Operating Systems support running Containers other than Windows 10, Windows 2016 and Windows 2019. Docker supports running containers natively on these 3 operating systems only. Most of the Cloud providers provide AMI with prebuilt windows Container support. We can use Windows Server 2019 Datacenter with Containers VM image on Azure, and Amazon's Microsoft Windows Server 2019 Base with Containers AMI on AWS to run our windows containers.
How does Communication happen?
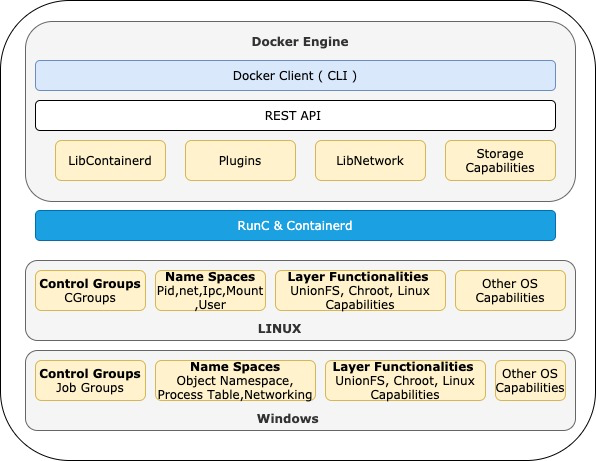
The Docker Engine communication in linux is pretty well known. All the tools like Cli, Compose etc talk to the engine using the Rest Based API calls. This engine in turn talks with Containerd or RunC to create a OCI complaint Container. The Underlying Host kernel will be shared with multiple containers and using the Kernel features like Cgroup,Chroot, Namespaces etc will provide required resources to the Containers.
The architecture looks the same for most of the top level components on the windows side too but it is quite different at the host level. The kernel mode is windows is quite different from Linux kernel as this includes not just the kernel but also including other services. Various managers for Objects, processes, Memory, Security, Cache, Plug in Play (PnP), Power, Configuration and I/O collectively called Windows Executive(ntoskrnl.exe) are available. So there are no separate Namespace or Cgroup implementations in Windows instead came up with “Compute Service Layer” at Os level which provides namespaces, resource control and UnionFS capabilities. This layer is responsible for managing the containers like start,stop etc which containerd in linux does. So there will be no separate containerd or runC in windows. All the tasks of these will be done by this Compute layer.
What is different from Linux Containers?
The way that the Windows Containers run on windows platform is quite different from the way linux containers run on *nix based Operating systems.
Windows is a highly integrated operating system that exposes its API with DLL’s and not by SysCalls. In windows, an application cannot directly make a system call like in *nix based systems. Every kernel action that the application wants to perform will communicate with the .dll ( dynamic linked library ) that talks to the windows manager which in turn performs the kernel action. The Underlying process of how the DLL’s work and how they talk to the Operating System services is undocumented. In basic terms, all kernel actions like allocating memory, hardware requirements etc will go through .dll to the windows manager which in turn provide the requested service. This goes in the same way for applications running inside the windows containers. For every kernel action requested by the application running inside the container would go through the .dll and then to the windows Operating system. The application running in the container would require the same .dll files for routing the kernel actions to the windows operating system.
For this the windows container will have the application running and also certain services that are required for the application to connect to the windows operating system and other things. This is what we call Windows server containers or Process Containers.
Isolation modes
In order to run a container, Windows provides two different modes of runtime isolation i.e Process Isolation and Hyper-V Isolation. These 2 modes let windows containers run in different ways.
Process Containers
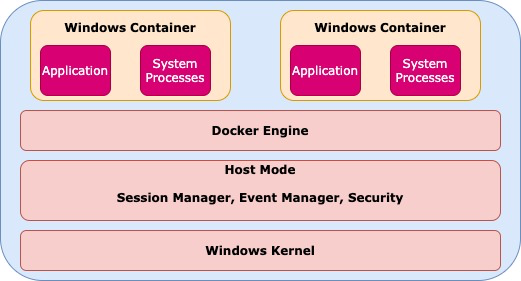
As we can see in the above image, the windows server containers or process containers will have both application process ( asp.net or C# ) and system process ( .dll and other api related calls ). This is the reason why the windows container images are huge in-size since we have the application code along with the system process like dll etc.
This is where a very important thing comes into picture. That is in a Linux Operating system, we can run a Centos Container on a RHEL machine or a SUSE linux container on a Ubuntu machine. This happens because the container shares the same host kernel. But in windows, we have a dependency with the system process ( .dll etc ) running inside a container which might change from build to build in windows. For this reason, we can only run a windows container on a windows machine which has the same operating system flavors. That is we cannot run a windows container built with windows 10 on a windows 2016 server or windows 2019 server. We need to have the same flavor of operating system for containers and also running on host. Most of the time, the container will start but some of its features will be restricted or not guaranteed.
Creating your first Windows Process Container
For creating our windows container, we will be using Amazon AMI for creating our windows instance which have Docker already installed. Create a Windows Ec2 Instance from the AMI “Windows_server-2019-ECS_Optimized” ( ami-05f51a63adfbce152). I will be using the Windows 2019 Base machine with Docker preinstalled.
Run the windows Process Container as below,

We ran the below command to pull the 2019 image and run the container as below,
docker run mcr.microsoft.com/windows/servercore:ltsc2019
Or we can also run the Windows process container by passing the isolation parameter as below
The default entrypoint for each Windows base OS image as a console, either cmd.exe or PowerShell. The command can be something similar to how we run in Linux as below,
docker run -it mcr.microsoft.com/windows/servercore:ltsc2019 cmd.exe
docker run -it mcr.microsoft.com/windows/servercore:ltsc2019 powershell.exe
In both the cases, we are running the same docker windows image with either cmd.exe or powershell.exe are landing zones similar to bash. The default is cmd.exe. Most of the commands for Docker remain the same on both Linux and windows machines. There are 4 types of images provided by Microsoft.
Windows Server Core : For supporting traditional .net applications
Windows Nano Server : for core .net applications
Windows : Provides full windows capabilities
Windows IOT : for IOT applications.
Many Windows users want to containerize applications that have a dependency on .NET. In addition to the four base images described here, Microsoft publishes several Windows container images that come pre-configured with popular Microsoft frameworks, such as the .NET framework image and the ASP .NET image.
We can see that we have 2 base images available for Windows .net applications, windows server Core and nano server. Both these images are quite commonly used but have few differences. Nano Server has a significantly smaller API in which some of the windows services like powershell, WMI etc are not available. Nano Server was built to provide just enough API surface to run apps that have a dependency on .NET core.
Note - The important point over here, Microsoft does not publish images with the latest tag, it will always be a ltse or other thing ( Long term servicing channel ).Please declare a specific tag when pulling or referencing images from this repo.
Building Your First Docker Windows Image for Windows Containers
Building the Docker Image is quite the same as the Linux Image. Below is the Dockerfile contents for a Nginx process to run,
FROM mcr.microsoft.com/windows/servercore:ltsc2019
LABEL Description="Nginx" Vendor="Nginx" Version="1.0.13"
RUN powershell -Command \
$ErrorActionPreference = 'Stop'; \
Invoke-WebRequest -Method Get -Uri http://nginx.org/download/nginx-1.9.13.zip -OutFile c:\nginx-1.9.13.zip ; \
Expand-Archive -Path c:\nginx-1.9.13.zip -DestinationPath c:\ ; \
Remove-Item c:\nginx-1.9.13.zip -Force
WORKDIR /nginx-1.9.13
CMD ["/nginx-1.9.13/nginx.exe"]
All the Commands above are quite the same as those we use in Linux Image Building.
Build the image using the docker build command as,
PS C:\Users\Administrator\windows-docker-files> docker build -t first-windows-dockerfile .
Sending build context to Docker daemon 2.048kB
Step 1/5 : FROM mcr.microsoft.com/windows/servercore:ltsc2019
---> 8351e66084ac
Step 2/5 : LABEL Description="Nginx" Vendor="Nginx" Version="1.0.13"
---> Running in 99a432826c7b
Removing intermediate container 99a432826c7b
---> 20ab94cb14d8
Step 3/5 : RUN powershell -Command $ErrorActionPreference = 'Stop'; Invoke-WebRequest -Method Get -Uri http://nginx.org/download/nginx-1.9.13.zip -OutFile c:\nginx-1.9.13.zip ; Expand-Archive -Path c:\nginx-1.9.13.zip -DestinationPath c:\ ; Remove-Item c:\nginx-1.9.13.zip -Force
---> Running in c80bfc7227e1
Removing intermediate container c80bfc7227e1
---> 7ccd7d81b336
Step 4/5 : WORKDIR /nginx-1.9.13
---> Running in a46cf2a47431
Removing intermediate container a46cf2a47431
---> 7f8fd47864de
Step 5/5 : CMD ["/nginx-1.9.13/nginx.exe"]
---> Running in 75821cd15632
Removing intermediate container 75821cd15632
---> f793d005d447
Successfully built f793d005d447
Successfully tagged first-windows-dockerfile:latest
Once the image is build, check the images using the “docker images”
PS C:\Users\Administrator\windows-docker-files> docker images REPOSITORY TAG IMAGE ID CREATED SIZE first-windows-dockerfile latest f793d005d447 2 minutes ago 4.85GB
Run the Docker image using the “docker run” command as,
C:\Users\Administrator\windows-docker-files> docker run -d -p 80:80 first-windows-dockerfile ef113bcb3567711958909394c6beff4082e618bea92dd57374a7cfb11d847519
Check if the docker container is running or not using,
PS C:\Users\Administrator\windows-docker-files> docker ps
CONATINER ID IMAGE COMMAND ef113bcb3567 first-windows-dockerfile "/nginx-1.9.13/nginx…"
*******
Hyper-V Containers
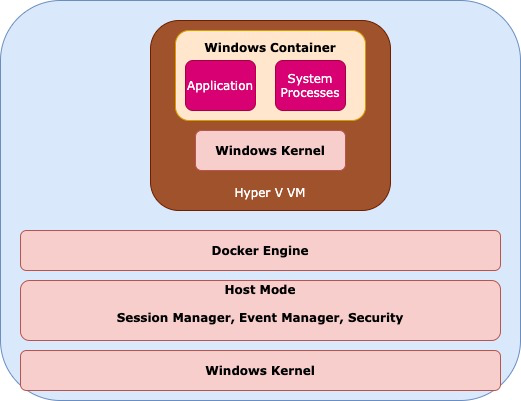
With the above Windows Process Containers, we have a challenge where there is a dependency on the Host Operating system version. As we said earlier, we have to have both the Container Operating system version and the Host version as same Since we will be communicating with system processes ( dll). If there is any change on the Host Operating system, this can break the application running in the container.
This is where Hyper-V containers came in use. Hyper-V is a hypervisor-based virtualization technology for certain x64 versions of Windows. The hypervisor is core to virtualization. It is the processor-specific virtualization platform that allows multiple isolated operating systems to share a single hardware platform.
Rather than running a Windows Container on a Host Operating system, we run the containers on a Hyper-V virtual machine which in-turn run on the Host machine. First Hyper-V containers use the base image defined for the application and automatically create a Hyper-V VM using that base image. Inside the VM we will have the necessary binaries and libraries for our application run along with the windows Container. The windows container will have the application along with windows services to talk to the host kernel. The only difference is the Windows container is now running inside a Hyper-V VM which provides kernel isolation and separation of the host patch/version level from that used by the application. The other advantage is that we can use multiple hyper-V containers and can use the common base image and no management is required in creating the Hyper-V VM as it is taken care automatically.
Creating your first Hyper-V Container
For running a Windows Process Container, we ran it without passing the isolation parameter but for the Hyper-V container, we have to pass the isolation parameter. Docker by default creates a Windows Process Container if we dont pass the isolation parameter but we have to pass the isolation parameter for Hyper-V containers.
Run the Hyper-V container using,
Once you run the above command, we can still see the docker containers using the “docker ps” command as below,
PS C:\windows\system32> docker ps
CONTAINER ID IMAGE COMMAND CREATED STATUS PORTS NAMES
1fa84490a13b mcr.microsoft.com/windows/servercore:ltsc2019 "cmd" ******
Windows also provides another way to check if the Hyper-V container is up and running. We can the processes using powershell “get-process” command as below,
PS C:\windows\system32> get-process -Name vmwp
Handles NPM(K) PM(K) WS(K) CPU(s) Id SI ProcessName
------- ------ ----- ----- ------ -- -- -----------
1565 18 8764 17028 2.45 9792 0 vmwp
280 14 5104 19148 1.47 10148 0 vmwp
For every Hyper-V container, there will be a vmwp process created. There is a Virtual machine worker process ( vmwp ) for every virtual Machine that gets created. This is actually the running virtual machine that is encapsulating the running container and protecting the running processes from the host operating system.
Image2Docker
Since now we have support for running containers on Windows but in the earlier phases we have many of the windows applications running in a light-weight Hyper-V container or Virtual machines. So there is a need for a tool to convert or analyze these Virtual machines to identify what type of application is running and convert them to Dockerfile that can be used to build the windows image.
Image2Docker is a powershell module that will analyze the Virtual Hard disk image(vhdk), scan for the most common windows components and suggest a Dockerfile.
Install the Powershell Module
Start the powershell command prompt and run the following commands to install the Image2Docker module as below,
PS C:\dockfile> Install-Module Image2Docker
PS C:\dockfile> Import-Module Image2Docker
Once the module is installed, run the “Get-WindowsArtifact” command to see the supported Windows components as below
PS C:\dockfile> Get-WindowsArtifact
AddRemovePrograms
AllWindowsFeatures
Apache
DHCPServer
DNSServer
IIS
MSMQ
SQLServer
For the article, i have created a Virtual Machine and used this for our Image2Docker scanning as below,
PS C:\dockfile> ConvertTo-Dockerfile -ImagePath "
C:\Users\Public\Documents\Hyper-V\Virtual Hard Disks\Test1.vhdx" -Artifact IIS -ArtifactParam aspnet-webapi -OutputPath c:\i2d2
The Command we will be using is “ConverTo-Dockerfile” and we will be passing the vhdx location for -ImagePath, Artifact type and OutputPath for generating the Dockerfile location.
ConvertTo-Dockerfile
-ImagePath " C:\Users\Public\Documents\Hyper-V\Virtual Hard Disks\Test1.vhdx"
-Artifact IIS
-ArtifactParam aspnet-webapi
-OutputPath c:\i2d2
In order to run this command we have to first stop the Virtual Machine. This will mount the vhdx image file and once the scan is done, it will unmount the image. This will also generate the Dockerfile for us in the OutputPath location as we pass.
In the OutputPath location, run the “docker build” command as below,
PS C:\dockfile> docker build --isolation hyperv -t sample .
PS C:\dockfile> docker run -d --isolation hyperv sample
Two important things to remember here is to build and run the image passing the isolation parameter. The Image build will also fail if we dont pass the isolation parameter as above.
More to Come, Happy Learning :=)
Great article, Thank you for sharing.
ReplyDelete