Pages

Showing posts with label git. Show all posts

Wednesday, March 6, 2019

Git branching Model

While working with the git and Github  it is very important to have a consistent branching model. Developers create many branches so they can work with the code. But having a consistent branch model for our development saves a lot of time. This article talks about the branch model that fits most organisations. 

Every team will have 2 main branches develop and master. Parallel to the master branch , another branch exists called develop. So most of the times develop is the one that code gets pushed always. 

Master - The origin/master is the main branch where Source Code always reflects to the production ready state.

Develop - Also origin/develop is the main branch where the source code which reflects to the latest delivered development changes for the next releases. Some people call this as the “integration branch”. This is the branch where all the nightly builds use to build and make sure the code is set.

When the source code in the develop branch reach to a stable point and is ready to be released then all changes are merged from develop branch to the master branch. Then master will be tagged with a release number and deployed.

So any changes done to the master branch is a production release automatically. We can use a Git hook or a Jenkins build to identify changes to the master branch, build it and release to the production automatically.

Other helping branches
Other than the master and develop branches there will many other branches that will be created and deleted based on the requirements. These branches are used to aid parallel development between team, feature development, production release , bug fixing, live production problem solving etc.

These branches after some time will eventually be removed. These branches include
Feature Branches
Release Branches
Hotfix Branches

Each of these branches are defined keeping specific purpose in mind and a are bound to strict rules like which branch is the parent and which branch is the target. 

Feature branches - Feature branches or sometime called as topic branches are used to develop new features for the upcoming releases. These release can be any time but based on the priority of the feature , a feature branch is created from the develop branch. The parent branch for a feature branch is the develop branch.

The target branch will not be known during the time of the feature branch. It may either merge back to the develop branch or to another feature branch or it can discarded completely ( in case if the feature is not required ).

Release Branch - Release branches are created so that they can support a new production release. The release branch will be created from the develop branch. The develop branch in turn should contain all the features, changes that are agreed for that release. All these changes and features are developed and then merged back to the develop branch. The changes once merged to the develop branch are then merged back to the master branch. Every changes to the master is a new production release by default.

Basically forking a branch from the develop branch for a release starts a release cycle. At this moment no new changes or features can be added to the release branch at this point. Only bug fixes, documentation, testing, security checks and other release oriented tasks should go in this branch. Once this is ready, the release gets merged into the master and tagged with a version number. It should also be merged back to the develop branch which may be progressed since the release was initiated.

Using a separate dedicated branch to prepare releases makes it possible for one team to work only on this branch and polish it for the current releases and other teams work on new features for the next releases. 

HotFix Branch - These branch are very special as they are not planned before. These branches are created from the master branch in order to solve a production issues. When a release is done , and if the team identifies a bug or problem they create a branch from the corresponding tag on the master branch that marks the production version.

Once the bug fixing is done for the hotfix branch, it is then merged back to the master branch with a tag and released to production. The changes are again merged back to the develop branch to fix the same bug in the develop branch.

More to Come, Happy Learning 
Read More

Monday, March 4, 2019

GIt - Working Tree, Staged ,Committed

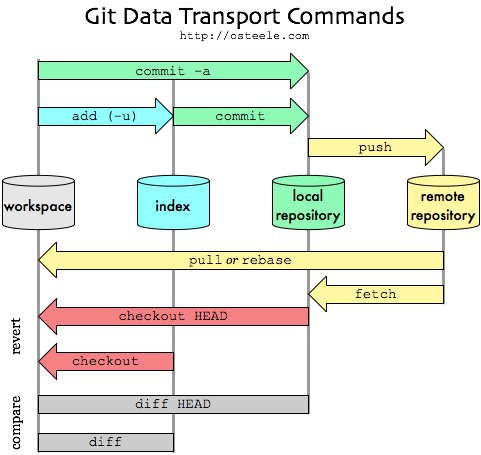
Our original repository exists in a separate machine. A mirror of that repository exists in our local machine we call it as local repository. When ever we have completed our code we generally push the code from our local repository to the main repository. There are multiple things that happen before pushing our code from local to main repository.

Working Tree - Whenever we want to contribute to a project, we download the source code which is checking out the source code from the main repository. The source code once checked out to our local machine is called working tree. We modify the code that is available in this local repository.

Staging - Staging is an intermediate layer between working tree and local repository. Staging is a step before the commit process in git. We make changes to the source code and add them to this staging area. As long as the modified files are in staging area

git allows you to edit it as you like (replace staged files with other versions of staged files, remove changes from staging, etc.).

Why do we need stage?
The practical purpose of the staging is a logical separation of file commits. Let's say i have to make changes to 2 files. Now by the end of day, i was able to make the code changes to the first file and did a half change to the second file. If i did not have stage location and i commit changes directly to the local repository and push to main repo, i'm breaking the code because the second change is only half made.

In this case , i can push the changes to the stage location and then to the local repo. Once i push the local repo to main repo, it is not breaked as we pushed completed changes only.

Where does the staging area located?
The staging area is located inside the .git location. The index file in this location is a single, binary file which lists all files in the current branch including their checksums, time stamps and file names.

Commit - this is final step in our local repository. Whatever the code changes that we did we push it to the local repository and this operation is called as “commit”.

Where is the code pushed to local repository located?
The local repository is a hidden directory under the .git location which includes a objects directory. This contains all versions of every single file in the repo ( local branches and copies of the remote branches ) and are compressed as blob files.

The below image represents the process,
Local repository or working tree is where we make the source code changes. A file in the working tree of a git repository can have 4 states. These states are

Untracked - this file is not tracked by the git repository. This means the file is never staged or committed
Tracked - committed to the local repository
Staged - code is available in stage location
dirty/modified - the file is modified but the changes are not staged.
jagadishsample$Mon Feb 18@ git init
Initialized empty Git repository in /Volumes/Available/sample/.git/
jagadishsample$Mon Feb 18@ touch one two three
jagadishsample$Mon Feb 18@ git status
On branch master

No commits yet

Untracked files:
 (use "git add ..." to include in what will be committed)

    one
    three
    two

nothing added to commit but untracked files present (use "git add" to track)
jagadishsample$Mon Feb 18@

We can see that all files one, two , three are in untracked states. Now do a “git add one” command and we can see the file one moves to the tracked status showed under the status “changes to be committed”
jagadishsample$Mon Feb 18@ git status
On branch master

No commits yet

Changes to be committed:
 (use "git rm --cached ..." to unstage)

    new file:   one

Untracked files:
 (use "git add ..." to include in what will be committed)

    three
    two


Now lets edit the file one and see the output. The file one will be in both stage mode and in dirty mode as we made the changes.
jagadishsample$Mon Feb 18@ git status
On branch master

No commits yet

Changes to be committed:
 (use "git rm --cached ..." to unstage)

    new file:   one

Changes not staged for commit:
 (use "git add ..." to update what will be committed)
 (use "git checkout -- ..." to discard changes in working directory)

    modified:   one

Untracked files:
 (use "git add ..." to include in what will be committed)

    three
    two

Now once we do a git commit, we can see the file one that was staged before making changes is committed and changes that we did is not yet staged.
jagadishsample$Mon Feb 18@ git status
On branch master
Changes not staged for commit:
 (use "git add ..." to update what will be committed)
 (use "git checkout -- ..." to discard changes in working directory)

    modified:   one

Untracked files:
 (use "git add ..." to include in what will be committed)

    three
    two

no changes added to commit (use "git add" and/or "git commit -a")

Similarly as we use the git status to we have a short status available using “git status -s”. The out put of the git short status is different

File that are not tracked as shown using “??”. New files that have been added to the staging area have an “A”. modified file have an “M”. There are some times 2 column output - the left hand column indicates the status of the staging area and right column indicate the status of the working tree.
jagadishsample$Mon Feb 18@ git status -s
?? one
?? three
?? two

jagadishsample$Mon Feb 18@ git status -s
A  one
?? three
?? two

jagadishsample$Mon Feb 18@ git status -s
AM one
?? three
?? two

jagadishsample$Mon Feb 18@ git status -s
M one
MM three
?? two

If you see the one file is given with “AM” which means that file is in staging mode and also edited ( dirty ). In the last image, we see only “M” for one file which means that file is in working tree but not staged. The “MM” means that file is modified and staged.
Read More

Git - Understanding Repositories

A repository contains the history of a collection of files starting from a certain directory. The process of copying a git repository using git tool is called cloning. Once the cloning is done and repository is available on our local machine we can have the complete history of the repository on our local machine.

Git has 2 types of repositories - bare and non-bare repository

Non - bare repositories : this is by default type of repository that we will use most of the times. When there is a repository available and a user clone the repository , the repo that comes to our local machine is called the non-bare repository. The .git directory will be available inside this non-bare repositories.

Bare repositories - these are the types of repositories that are created on the server for sharing changing from the developers.


How things work?Most times a server admin will create a bare repository on the server. He then configures the ssh. On the other hand , user who want to add changes to this repository first clone this bare repository using the ssh communication. Once they clone the repo, a local copy will be available to this which is a non-bare repo. They then commit changes to the local repo. They then configure their local git with the remote location of the bare repo ( server ). Finally they push the changes from their local to the remote repo.

Create a bare repository - Creating a bare repo can be done by using the “git init --bare” command as below,
jagadishAvailable$Wed Feb 20@ mkdir project.git
jagadishAvailable$Wed Feb 20@ cd project.git/
jagadishproject.git$Wed Feb 20@ git init --bare
Initialized empty Git repository in /Volumes/Available/project.git/
jagadishproject.git$Wed Feb 20@ ls -alrt
total 24
drwxrwxr-x  14 root admin  544 Feb 20 06:29 ..
drwxr-xr-x   4 jagadish admin  136 Feb 20 06:29 refs
drwxr-xr-x   4 jagadish admin  136 Feb 20 06:29 objects
drwxr-xr-x   3 jagadish admin  102 Feb 20 06:29 info
drwxr-xr-x  13 jagadish admin  442 Feb 20 06:29 hooks
-rw-r--r--   1 jagadish admin   73 Feb 20 06:29 description
-rw-r--r--   1 jagadish admin  111 Feb 20 06:29 config
drwxr-xr-x   2 jagadish admin   68 Feb 20 06:29 branches
-rw-r--r--   1 jagadish admin   23 Feb 20 06:29 HEAD
drwxr-xr-x  10 jagadish admin  340 Feb 20 06:29 .

In the above, i have created a directory “project.git” and inside the project.git, ran the “git init --bare” command which will create a bare repository. I created the bare repository as user jagadish. I have the credentials for the user.

Generate public/Private RSA Key Pairs - in order for the communication to happen between the server machine ( remote repo ) and the clients, we need to configure the ssh communicate between them. Let’s say that we have a user root from a different machine who wants to clone the remote repo and make some changes to the code. Once done he wants to push them back to the remote repo.
 

In order to configure the remote repo, use the “ssh-keygen” command available. I Am running the ssh-keygen command as root user on the client machine

[root@vx111a docker]# ssh-keygen
Generating public/private rsa key pair.
Enter file in which to save the key (/root/.ssh/id_rsa):
Enter passphrase (empty for no passphrase):
Enter same passphrase again:
Your identification has been saved in /root/.ssh/id_rsa.
Your public key has been saved in /root/.ssh/id_rsa.pub.
The key fingerprint is:
8e:d3:a5:5d:f6:a4:7f:5b:b0:e1:1e:5e:f3:3c:16:63 root@vx111a.jas.com

The key's randomart image is:
+--[ RSA 2048]----+
| |
| |
| |
| |
| S . o + |
| + + o = E |
| o + . . *.=|
| . + *=|
| =o=|
+-----------------+

Once this is done , we will now have the Public key and private keys available. The public key is available in the ~/.ssh/ id_rsa.pub file. Never share the private key file.
Copy the public key file to the server machine - Once we have the public key, we need to add that to the server machine ( remote repo ) for further all communications. We can use the “ssh-copy-id” command to copy our public key to the remote machine. 

[root@test-machine ~]# ssh-copy-id -i ~/.ssh/id_rsa.pub jagadish@192.168.31.177
/bin/ssh-copy-id: INFO: Source of key(s) to be installed: "/root/.ssh/id_rsa.pub"

The authenticity of host '192.168.31.177 (192.168.31.177)' can't be established.
ECDSA key fingerprint is SHA256:lMv3LvIWIsG9MI7ipWHXXP9PZfIrPsSN6KpWrQrDWPI.
ECDSA key fingerprint is MD5:46:92:90:50:0f:7f:ee:e6:2d:07:a6:96:0e:95:e1:90.
Are you sure you want to continue connecting (yes/no)? yes
/bin/ssh-copy-id: INFO: attempting to log in with the new key(s), to filter out any that are already installed
/bin/ssh-copy-id: INFO: 1 key(s) remain to be installed -- if you are prompted now it is to install the new keys
Password:

Number of key(s) added: 1

Now try logging into the machine, with:   "ssh 'jagadish@192.168.31.177'"
and check to make sure that only the key(s) you wanted were added.

I got the Ip address of the remote machine and used the command “ssh-copy-id -i ~/.ssh/id_rsa.pub jagadish@192.168.31.177”. This will ask for a password and once we enter , it will add the public key of this machine to the remote machine. Once successfully added, we can login to the remote machine using the ssh command.

Now that the communication is success, we now need to clone the repo from the server to the local machine with user root as below,

[root@test-machine ~]# git clone jagadish@192.168.31.177:/Volumes/Available/project.git
Cloning into 'project'...
warning: You appear to have cloned an empty repository.

Once i run the “git clone” command by passing the repo location from the server machine, i was able to clone the repo to my local machine. We then see a directory with the name project. Once we move inside the project we can .git directory available. This is one of the difference between bare and non-bare repositories. In a non-bare repository, the .git directory is created in the project. For the bare repositories, the .git directory is not created but multiple files are created. These files are the same files that exist in .git location of a non-bare repo.

Configuring the Git - Now that we were able to clone the code from the remote machine we now need to configure the git with certain parameters. The include username, email etc. the most important of the configuration is the remote repo configuration.

Configure user name and email - To configure user name and email ID, run the below

git config --global user.email "root@example.com"
git config --global user.name "rootUser"

Configure the Remote Repo location - Once we have done the basic configuration , we need to configure the remote repo location. Once we make any changes to the code, we need to push them to the remote repo location so that the changes are available on the server for other users and clients. To configure the remote repo location run the below,

[root@test-machine project]# git remote add origin jagadish@192.168.31.177:/Volumes/Available/project.git

This will add the origin ( remote repo location ) details to the current git. In order to check that use the command “git remote -v” as,
[root@test-machine project]# git remote -v
origin    jagadish@192.168.31.177:/Volumes/Available/project.git (fetch)
origin    jagadish@192.168.31.177:/Volumes/Available/project.git (push)

Now that we have configured both user configuration and the repo details, let's push some code to the local repo and push the changes to the remote repo

[root@test-machine project]# echo “hello world” >> one

[root@test-machine project]# git add one

[root@test-machine project]# git commit -m "first file: one commit by root user"

[master (root-commit) 424fbce] first file: one commit by root user
1 file changed, 1 insertion(+)
create mode 100644 one

Review the Changes - Once our changes has been committed, lets review them before they were pushed to the remote repo. This can be done by using the “git log” command as below,

[root@test-machine project]# git log
commit 424fbce5183e1fe14b42a4c16e23b1fe1a7bc0f2
Author: rootUser
Date:   Wed Feb 20 02:58:25 2019 +0000

   first file: one commit by root user

This command will show the details of the commit history. It will show you all the commits that happened until now on the repository.

Similar to the “git log” command, “git show” command also gives details about the latest commit with few additional details as,

[root@test-machine project]# git show
commit 424fbce5183e1fe14b42a4c16e23b1fe1a7bc0f2
Author: rootUser
Date:   Wed Feb 20 02:58:25 2019 +0000

   first file: one commit by root user

diff --git a/one b/one
new file mode 100644
index 0000000..6d8f933
--- /dev/null
+++ b/one
@@ -0,0 +1 @@
+this is the first one file

Change the Commit Comments - If we want to change the comment added during the last commit, we can do that by using the “amend” option with “git commit” command as,

[root@test-machine project]# git commit --amend -m "changed comments by amend command"
[master a1bfd95] changed comments by amend command
1 file changed, 1 insertion(+)
create mode 100644 one
[root@test-machine project]# git log
commit a1bfd951ee1916637aeddf4ee824678bf5a4a8d4
Author: rootUser
Date:   Wed Feb 20 02:58:25 2019 +0000

   changed comments by amend command

Push the changes to the master - Now let’s push the code to the master repo using,

[root@test-machine project]# git push origin master
Counting objects: 3, done.
Writing objects: 100% (3/3), 240 bytes | 0 bytes/s, done.
Total 3 (delta 0), reused 0 (delta 0)
To jagadish@10.135.114.53:/Volumes/Available/project.git
* [new branch]      master -> master

Convert a Git repo to Bare repo - Converting a normal Git repository to a bare repository is not directly support by Git.You can convert it manually by moving the content of the .git folder into the root of the repository and by removing all others files from the working tree. Afterwards you need to update the Git repository configuration with the git config core.bare true command.

As this is officially not supported, you should prefer cloning a repository with the --bare option.
Read More