Pages

Showing posts with label build. Show all posts

Wednesday, March 6, 2019

Jenkins - Decrypt Credentials

Most of the communication with external tools from Jenkins are done by configuring a credentials to access the tool. We first configure the credentials with the tool username and password or a ssh key. We then use that credential ID which helps in connecting to the tool.

Sometimes there may be cases where we forget about the credentials that we configured either it can be user name or password or other. Jenkins provides us a way to encrypt and decrypt credentials using Grrovy code.

The credentials that we configure are saved in the credentials.xml file in the Jenkins home directory ( /var/jenkins/ ). If we take a look at the credentials.xml file we can see that each of the credentials that we define are available here. The elements starts from

         GLOBAL
         root-password
         root-password
         root
         {AQAAABAAAAAQWG7+E2gb06CKPCHsgTNNeC7xIZ4EIkRCFNZOEKAyDZs=}
       

Now the text between the elements is the password that we configured but encrypted. We can copy this go to the “Manage Jenkins -> Script Console”

And enter the code as - println(hudson.util.Secret.fromString("{AQAAABAAAAAQWG7+E2gb06CKPCHsgTNNeC7xIZ4EIkRCFNZOEKAyDZs=}").getPlainText())

This will print the result at the bottom with the plain text password. The syntax look as, println(hudson.util.Secret.fromString("").getPlainText())

If we want to encrypt the value we can use the same code as,
println(hudson.util.Secret.fromString("some_text").getEncryptedValue())

Hope this helps.
Read More

Thursday, August 25, 2016

Sonar Integration with maven

In the next series of sonar, we will see how we can integrate sonar with maven and use maven command in analyzing the source code of a project and display the results on the sonarqube console.

1. Make sure JDK,Maven and Sonar are available ( with sonar running ).
2. Make the changes to the global maven setting.xml file available at location ~/.m2
3. Add the pluginGroups as,
    <pluginGroups>
        <pluginGroup>org.sonarsource.scanner.maven</pluginGroup>
    </pluginGroups>

4. Add the Profile pointing the location of the sonar console as,

   <profile>
        <id>sonar</id>
         <activation>
              <activeByDefault>true</activeByDefault>
          </activation>
          <properties>
              <sonar.host.url>http://puppet.jas.com:9000</sonar.host.url>
          </properties>
    </profile>

4. Once the changes are done, Move to you java application and run,

[puppet@root$:/work/testing/javaee7-simple-sample]$ mvn clean verify sonar:sonar
[INFO] Scanning for projects...
[INFO]                                                                        
[INFO] ------------------------------------------------------------------------
[INFO] Building javaee7-simple-sample 1.11-SNAPSHOT
[INFO] ------------------------------------------------------------------------
[INFO]
[INFO] --- maven-war-plugin:2.3:war (default-war) @ javaee7-simple-sample ---
[INFO] Packaging webapp
[INFO] Assembling webapp [javaee7-simple-sample] in [/work/testing/javaee7-simple-sample/target/javaee7-simple-sample]
[INFO] Processing war project
[INFO] Copying webapp resources [/work/testing/javaee7-simple-sample/src/main/webapp]
[INFO] Webapp assembled in [63 msecs]
[INFO] Building war: /work/testing/javaee7-simple-sample/target/javaee7-simple-sample.war
[INFO]                                                                        
[INFO] ------------------------------------------------------------------------
[INFO] Building javaee7-simple-sample 1.11-SNAPSHOT
[INFO] ------------------------------------------------------------------------
[INFO]
[INFO] --- sonar-maven-plugin:3.0.2:sonar (default-cli) @ javaee7-simple-sample ---
 [INFO] User cache: /root/.sonar/cache
[INFO] SonarQube version: 4.5.7
[INFO] Default locale: "en_US", source code encoding: "UTF-8"
[INFO] [02:21:17.060] Load global referentials...
[INFO] [02:21:17.393] Load global referentials done: 334 ms
[INFO] [02:21:17.411] User cache: /root/.sonar/cache
[INFO] [02:21:17.420] Install plugins
[INFO] [02:21:17.739] Install JDBC driver
[INFO] [02:21:17.743] Create JDBC datasource for jdbc:h2:tcp://localhost/sonar
[INFO] [02:21:18.596] Initializing Hibernate
[INFO] [02:21:19.930] Load project referentials...
[INFO] [02:21:20.315] Load project referentials done: 385 ms
[INFO] [02:21:20.315] Load project settings
[INFO] [02:21:21.131] Loading technical debt model...
[INFO] [02:21:21.151] Loading technical debt model done: 20 ms
[INFO] [02:21:21.153] Apply project exclusions
[INFO] [02:21:21.395] -------------  Scan javaee7-simple-sample
[INFO] [02:21:21.398] Load module settings
[INFO] [02:21:21.720] Loading rules...
[INFO] [02:21:22.089] Loading rules done: 369 ms
[INFO] [02:21:22.113] Configure Maven plugins
[INFO] [02:21:22.170] No quality gate is configured.
[INFO] [02:21:22.329] Initializer FindbugsMavenInitializer...
[INFO] [02:21:22.330] Initializer FindbugsMavenInitializer done: 1 ms
[INFO] [02:21:22.330] Base dir: /work/testing/javaee7-simple-sample
[INFO] [02:21:22.330] Working dir: /work/testing/javaee7-simple-sample/target/sonar
[INFO] [02:21:22.330] Source paths: src/main/webapp, pom.xml, src/main/java
[INFO] [02:21:22.330] Binary dirs: target/classes
[INFO] [02:21:22.331] Source encoding: UTF-8, default locale: en_US
[INFO] [02:21:22.331] Index files
[INFO] [02:21:22.363] 4 files indexed
[INFO] [02:21:22.414] Quality profile for java: Sonar way
[INFO] [02:21:22.427] Sensor JavaSquidSensor...
[INFO] [02:21:22.600] Java Main Files AST scan...
[INFO] [02:21:22.603] 4 source files to be analyzed
[INFO] [02:21:22.765] 4/4 source files analyzed
[INFO] [02:21:22.767] Java Main Files AST scan done: 167 ms
[INFO] [02:21:22.768] Java bytecode scan...
[INFO] [02:21:22.790] Java bytecode scan done: 22 ms
[INFO] [02:21:22.790] Java Test Files AST scan...
[INFO] [02:21:22.790] 0 source files to be analyzed
[INFO] [02:21:22.791] Java Test Files AST scan done: 1 ms
[INFO] [02:21:22.791] 0/0 source files analyzed
[INFO] [02:21:22.795] Package design analysis...
[INFO] [02:21:22.799] Package design analysis done: 4 ms
[INFO] [02:21:22.822] Sensor JavaSquidSensor done: 395 ms
[INFO] [02:21:22.822] Sensor QProfileSensor...
[INFO] [02:21:22.826] Sensor QProfileSensor done: 4 ms
[INFO] [02:21:22.826] Sensor InitialOpenIssuesSensor...
[INFO] [02:21:22.863] Sensor InitialOpenIssuesSensor done: 37 ms
[INFO] [02:21:22.863] Sensor ProjectLinksSensor...
[INFO] [02:21:22.866] Sensor ProjectLinksSensor done: 3 ms
[INFO] [02:21:22.867] Sensor VersionEventsSensor...
[INFO] [02:21:22.872] Sensor VersionEventsSensor done: 4 ms
[INFO] [02:21:22.872] Sensor FileHashSensor...
[INFO] [02:21:22.873] Sensor FileHashSensor done: 1 ms
[INFO] [02:21:22.873] Sensor SurefireSensor...
[INFO] [02:21:22.874] parsing /work/testing/javaee7-simple-sample/target/surefire-reports
[WARN] [02:21:22.874] Reports path not found: /work/testing/javaee7-simple-sample/target/surefire-reports
[INFO] [02:21:22.874] Sensor SurefireSensor done: 1 ms
[INFO] [02:21:22.874] Sensor Maven dependencies...
[INFO] [02:21:22.897] Sensor Maven dependencies done: 23 ms
[INFO] [02:21:22.897] Sensor CPD Sensor (wrapped)...
[INFO] [02:21:22.897] JavaCpdEngine is used for java
[INFO] [02:21:22.898] Cross-project analysis disabled
[INFO] [02:21:22.917] Sensor CPD Sensor (wrapped) done: 20 ms
[INFO] [02:21:23.018] Execute decorators...
[INFO] [02:21:23.121] Store results in database
[INFO] [02:21:23.208] ANALYSIS SUCCESSFUL, you can browse http://puppet.jas.com:9000/dashboard/index/org.javaee7.sample:javaee7-simple-sample
[INFO] [02:21:23.255] Executing post-job class org.sonar.plugins.core.issue.notification.SendIssueNotificationsPostJob
[INFO] [02:21:23.255] Executing post-job class org.sonar.plugins.core.batch.IndexProjectPostJob
[INFO] [02:21:23.272] Executing post-job class org.sonar.plugins.dbcleaner.ProjectPurgePostJob
[INFO] [02:21:23.283] -> Keep one snapshot per day between 2016-07-27 and 2016-08-23
[INFO] [02:21:23.284] -> Keep one snapshot per week between 2015-08-26 and 2016-07-27
[INFO] [02:21:23.284] -> Keep one snapshot per month between 2011-08-31 and 2015-08-26
[INFO] [02:21:23.284] -> Delete data prior to: 2011-08-31
[INFO] [02:21:23.288] -> Clean javaee7-simple-sample [id=1]
[INFO] ------------------------------------------------------------------------
[INFO] BUILD SUCCESS
[INFO] ------------------------------------------------------------------------
[INFO] Total time: 38.600 s
[INFO] Finished at: 2016-08-24T02:21:23-04:00
[INFO] Final Memory: 30M/319M
[INFO] ------------------------------------------------------------------------

Once the Build is success we can see the results in the console as,

More to Come, Happy learning J
Read More

SonarQube - Static Code Analysis

Testing is one of the important aspects of code to identify various issues that can occur while running the code. At the same time it is necessary to examine the code quality while moving the code to production.

Static analysis also called as static code analysis is a method of debugging that is done by examining the code without executing that. This allows developers a better understanding of the code structure and can help developers to ensure that the code adheres to industry standards. The main advantage of the static analysis is that it reveals errors that do not occur until months and years of application running. It is said that the static analysis is only a first step in a comprehensive software quality-control regime. Sonar is one such tool which provides us the static code analysis.

Sonar is an open source web-based application to manage code quality which covers seven axes of code quality as: Architecture and design, comments, duplications, unit tests, complexity, potential bugs and coding rules. Developed in Java and can cover projects in Java, FlexPHPPL/SQL,  Visual Basic 6. It's very efficient to navigate; offering visual reporting and you can follow metrics evolution of your project and combine them.

In this article we will see how we can install SONAR tool and use that.

1. Download SonarQube from here

2. Extract the tar file to /op/sonarqube.
Once extracted move to the /opt/sonarqube/bin/linux-x86-64.And run the “sonar.sh  start”.

That’s all you need to do in starting the sonarqube. Access the sonarqube console using the “localhost:9000” and we can see the web console as below,

 The default credentials for login are admin and admin. More to come using this tool. Stay learning J
Read More

Sunday, December 27, 2015

Jenkins with GIT

Jenkins provides us with various options in building the code. On the other hand, git provides us with the Source code management system. Jenkins provides us with various plug-ins in dealing with various repository systems. In this article we will see how we can configure Jenkins with the local Git Repository System.

This article will explain you on how to create a maven web application and use the git repository. The final step is to use the Jenkins with Git in building and packing into a war file.

1) Create a directory SampleTest
2) Inside the sampleTest , run the maven web application command as,

mvn archetype:generate -DgroupId=com.git.testing -DartifactId= sampleTest -DarchetypeArtifactId=maven-archetype-webapp -DinteractiveMode=false

[root@vx111a testing]# git status
# On branch master
#
# Initial commit
#
# Untracked files:
#   (use "git add <file>..." to include in what will be committed)
#
#       sampleTest /
nothing added to commit but untracked files present (use "git add" to track) 

[root@vx111a testing]# ll
total 0
drwxr-xr-x. 3 root root 30 Dec  3 14:47 sampleTest

3) Git add and commit

[root@vx111a testing]# git add .
[root@vx111a testing]# git status
# On branch master
#
# Initial commit
#
# Changes to be committed:
#   (use "git rm --cached <file>..." to unstage)
#
#       new file:   sampleTest /pom.xml
#       new file:   sampleTest /src/main/webapp/WEB-INF/web.xml
#       new file:   sampleTest /src/main/webapp/index.jsp
#

[root@vx111a testing]# git commit -m "Jenkins Testing with Local Repo"
[master (root-commit) 551c28c] Jenkins Testing with Local Repo
 3 files changed, 33 insertions(+)
 create mode 100644 sampleTest /pom.xml
 create mode 100644 sampleTest /src/main/webapp/WEB-INF/web.xml
 create mode 100644 sampleTest /src/main/webapp/index.jsp

Now if we check the git status, we can see the no untracked files.
[root@vx111a testing]# git status
# On branch master
nothing to commit, working directory clean

Configuring Jenkins
Once the maven application is done and git is configured, the next step is configure local git to jenkins in such a way that the jenkins build the locally developed code.


1) Download the Git-plugin using the manage Jenkins in the jenkins Web. Select the Manage Plug-in tab, go to the Available section and search for the GIT plugin. Once Obtained , check the plugin and click "Download now and install after restart"
2) The Installation goes with the plug-in installation and restart of the Jenkins
3) Now we will see how we use the installed plug-in along with local git repository to build the maven web application. For this choose the new Item and check for the "Maven project" . Give a Name to the item and click ok.
4) In the next page of the build item,  there are certain configurations that needs to be done.
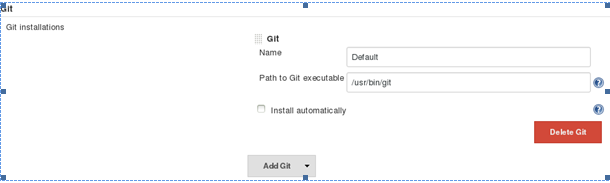
Provide the Git Executable location
Provide the Git repository user name and Email Details

Now this is the important part, For building the code from our local git repository and build the code we need to specify the path to the local Git repo as file:// protocol like this:
file:///home/ay/dev/projects/my_new_project

Now for our project we need to configure the Git repository details as, 

 If you see the Path of the local Git repository is "file:///work/SampleTest".

Provide the Local Git Credentials. This is one of the important Step in getting the source code from the local Git repository.

Click on the Add credentials under the Repositories in the above screen and provide the credentials that we are using for the local repository

Now once the changes are done run the Build now command and see the Console output to get the war file generation
Read More

Distributed Building aka Master - Slave in Jenkins

Jenkins besides acting a Continuous integration tool, it allows other configuration options which helps developers in many ways. One such facility provided by Jenkins is the configuration of the master-slave.

The most basic installation contains one Jenkins node called master operating itself. This master handles all the tasks for your build system. The slave can be taught as another Jenkins process which does the build jobs on  behalf of the master.

In most cases installing a slave doesn't change the behavior of the master. It will serve all HTTP requests, and it can still build projects on its own.

If we remember a executer is the one that does building the jobs in a parallel way. These executors can be created dynamically to run light weight jobs used mostly for the orchestration purposes. Once you install a few slaves you might find yourself removing the executors on the master in order to free up master resources.

Slaves are computers that are set up to build projects for a master. Jenkins runs a separate program called "slave agent" on slaves. When slaves are registered to a master, a master starts distributing loads to slaves. Term Node is used to refer to all machine that are part of Jenkins grid, slaves and master.

The exact delegation behavior depends on the configuration of each project; some projects may choose to "stick" to a particular machine for a build, while others may choose to roam freely between slaves.   
Since each slave runs a separate program called a "slave agent" there is no need to install the full Jenkins (package or compiled binaries) on a slave. There are various ways to start slave agents, but in the end the slave agent and Jenkins master needs to establish a bi-directional communication link (for example a TCP/IP socket.) in order to operate.

In this article we will see how we can configure Jenkins Slaves for distributed build management in our local environment. The same thing can be done with remote machines too. 

1) Go to the Manage jenkins -> Manage Nodes. We see a master Node being added on the left hand pane. This is the only node available at this moment to process the request like build.

2) Click on the new Node. On the left pane
Enter the Name you want for the new Node “slave”. Choose the Node to be a Dumb Slave. As said in the screen it self a Dumb slave does not provide any high level of integrations with any other slaves.

3) Now once the Dumb slave is created, click on the newly created slave to configure that. We need to configure the dumb slave
 Enter the Label of the slave as “slaveNode”. The label is very important for the slave. The same label will be used when distributing build to the slave nodes.
The launch Method is one very important element that defines how the node will be configured. The launch method contains,
Launch Slave Agents on UNix Machine via SSH
Launch Slave Agents via Java web Start
Launch Slave Via execution of command on the Master
Let jenkins control this windows slave as a windows service

We will be choosing the Launch slave via java web Start since we are doing this on our local machine. Java Web Start (also known as JavaWS, javaws or JAWS) is a framework developed by Sun Microsystems (now Oracle) that allows users to start application software for the Java Platform directly from the Internet using a web browser. Choose other options based on your requirement. Most cases in production environment we will be choosing “Launch  slave agents on unix Machine via SSH”
Now save the changes. Once the changes are completed we see the slave added to the Node Dashboard

At this moment the slave1 created is not active. We can see a red mark on that. Now click on the Slave1 and we can see that Launch button available.
Click on the launch button which will invoke a java web start slave agent like below,
Once the status on the dialog box shows as connected we can see the status of the Slave on the Node Dashboard as Active like below,
Now once the Slave agent is active we need to make a job run the Slave Node. For this Choose a Job already configured or configures a new one and go to the configuration for that job.Check the "Restrict where this project can be run" then we will see a Text box  under where we need to enter the Label expression which is the name of the Slave label that we created earlier. Enter label of the slave we created “slaveNode”. Now we can see a test saying "Label is serviced by 1 node" and click Ok
Now when we run the build , we can see
Building Remotely on slave1 (slaveNode1)  in workspace /opt/jenkins....
This is how we can configure the Master -salve nodes of jenkins in localhost

We can see the below output too,


Read More

Jenkins Basic Configuration

Jenkins CI is the leading open-source continuous integration server. Built with Java, it provides 985 plugins to support building and testing virtually any project. You can use it for build automation, test automation, build pipeline. Its open source and have lots of free plugins available.

Its Open Source alternative for paid CI servers like Atlassian Bamboo. This article will explain the basics configuration of Jenkins. Check the Jenkins installation from the previous articles. Once the jenkins installation is done, we can open the Jenkins tool using the localhost:8080 Url.

We see the below screen when we open the application. This application does have any users configured at this moment.
2) Configure the users and security
There will be no users configured when jenkins first start up. A Default user will be available in performing the basic actions like creating users/groups. It is necessary to configure the users before performing any sort of other actions. In order to create a basic user for performing administrative actions, enable the "Enable Security" under the Configure Global Security.
In the Access Control "choose the Jenkins Own User Database" and check the Box for "Allow Users to sign up". This will make sure the users will be allowed to create accounts which will be saved in the own jenkins user database.
Now for the Authorization , add a User/group as "testing" or whatever you would like to. Once added the user will be shown under the User/group tab. Choose the administrative actions that user should have like "Administer" , "Run Scripts" etc. Most cases we will select all options for our development purpose. For the user that is created , newly check all the options available.
Now once we restart the jenkins, it allows to sign up a new users. Create a new user with Sign Up options.
3) Configure System
This is the same user we will use to configure Jobs and other options in Jenkins. The first thing that we need to do after configuring the User is to configure the necessary libraries.
The most important ones are the JDK ,Ant and Maven Configuration. Configure the necessary environment libraries and configure the Locations as shown above based on your local configurations. 
4) Plug-in Management
Now once the security is set, users are configured and system is configured. It time to move to the Plug-ins. A plug-in are applications or programs that are easily installed or inserted in the existing software to perform additional functionalities.
Jenkins provides us vast number of plug-ins that allows the developers to perform numerous functionalities. Some of the plug-in that helps us to integrate other software tools like Jira ,Git and Github. 
Check the necessary plug-in from the "Manage Plug-ins" , Available tab. Once found like the Git plug-in below, check that select "Download now with/with out restart".
More to Come, Happy Learning
Read More

Saturday, December 26, 2015

Run Jenkins with different username

There are cases when running Jenkins, we see "Permission Denied" Errors. When running with a jenkins user , it can throw permission issues when creating the files like war or tar after build. This article tells us how to run  the Jenkins with a system user,

1) Change the user name in the jenkins Configuration file /etc/sysconfig/jenkins. Change the user name value for the variable $JENKINS_USER in this files. Add the new name with which you want to run the jenkins

$JENKINS_USER="root"

2) Once the user is changed, we need to change the permission for the new user on the jenkins data directories like home, webroot and logs

chown -R root:root /var/lib/jenkins
chown -R root:root /var/cache/jenkins
chown -R root:root /var/log/jenkins

Then restarted the Jenkins jenkins and check the user has changed using a ps command

/etc/init.d/jenkins restart

ps -ef | grep jenkins
Read More