Pages

Showing posts with label OpenShift. Show all posts

Saturday, June 13, 2020

Weave Scope - Troubleshooting & Monitoring for Docker & Kubernetes

Containers are of an ephemeral nature and are tricky to monitor compared to traditional applications running on virtual servers or bare metal servers. Yet container monitoring is an important capability needed for applications built on modern microservices architectures to ensure optimal performance.

Weave Scope is an advanced container troubleshooting and monitoring tool for Docker,Kubernetes and Amazon ECS. It not just monitors but provides additional capabilities like mapping application containers. In this article we will see the basics of Weave Scope and how it works.

Introducting WeaveScope

Weave Scope lets you monitor and control your containerized microservices applications. By providing a visual map of your Docker Containers, you can see the dependencies and communication links between them. Scope automatically detects processes, containers, hosts. No kernel modules, no agents, no special libraries, no coding.

The best feature of Weavescope is that it automatically generates a map of your application, enabling you to intuitively understand, monitor, and control your containerized, microservices-based application. For instance, if we have multiple front end and backend applications connecting to each other, weave will identify the connections and will generate a map for visualization.

Some of the best features of Weavescope are,
Manage and Montior containers in real time : provides an overview of the Container infrastructure, or foucs on a specific microservice. Helps in Easily identify and correct issues regarding the microservice.

Helps in interacting with the Container: We can directly launch a Command line from the Dashboard directly to the container for debugging and troubleshooting.

Metadata about the Containers : View contextual metrics, tags, and metadata for your containers

Map you architecture : Provides a detailed mapping of linked containers and infrastructure.

Installing WeaveScope : Installing WeaveScope is Quite Easy,
jagadishm@[/Volumes/Work]: sudo wget -O /usr/local/bin/scope \
https://github.com/weaveworks/scope/releases/download/latest_release/scope
jagadishm@[/Volumes/Work]: sudo chmod a+x /usr/local/bin/scope
jagadishm@[/Volumes/Work]: sudo scope launch

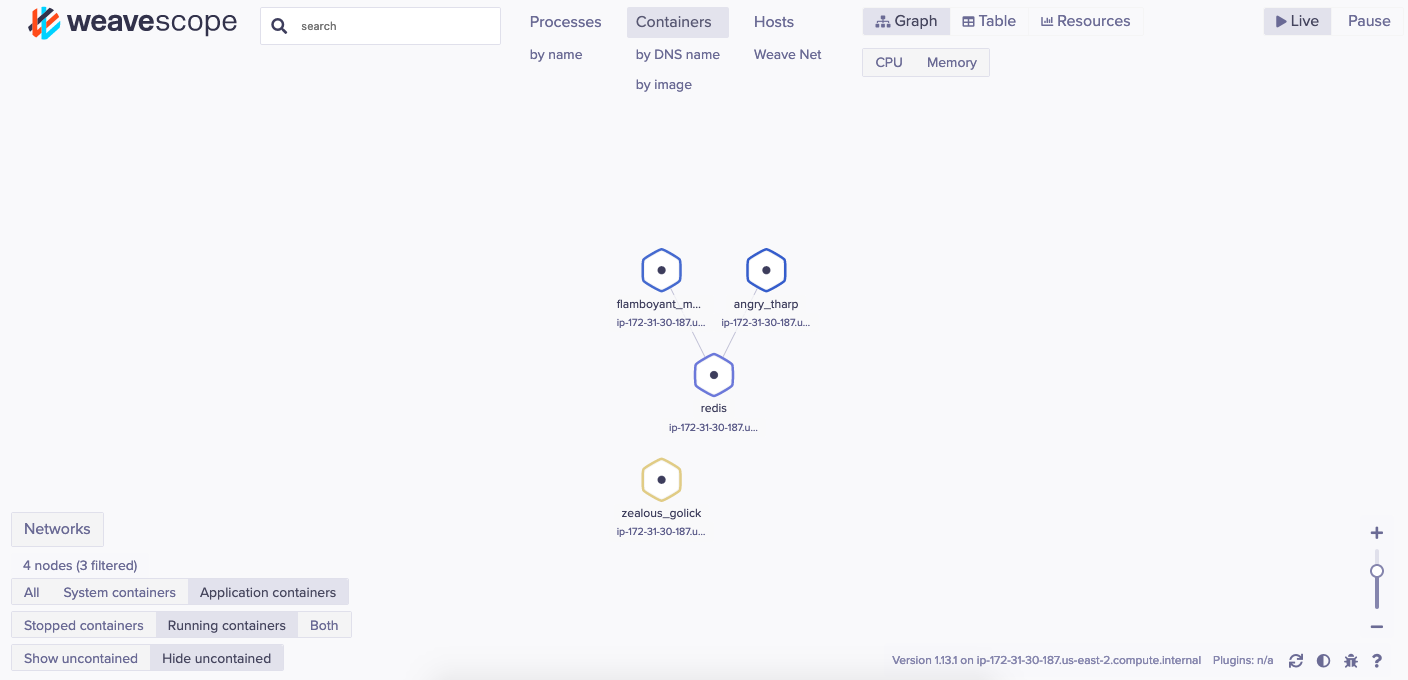
the UI is accessible on port 4040. Use the link below to visualize the Docker host. http://:4040. As new containers are launched, Scope will automatically update to reflect the live architecture. We can see the below dashboard with mapping of linked containers as below,

Weave Scope automatically identifies newly created containers and will show that on the Dashboard. From the UI you can see links and explore the details of each container node. These include CPU usage, TCP connections and memory load.The UI also allows you to attach and launch a shell prompt inside the container. By clicking on a node (the hexagon in Scope) you can find out more information about the container. The Container resource details are shown as below,

A Container shell can be triggered with the options available on the Container. If we see the below image, every container that we click will provide, attach, Exec Shell, Restart, pause and Stop options on the popup that open on clicking the container.

Click on the "exec Shell" to see a terminal is opened for the container where we can login to the container and perform actions like below,


 Hope this helps in starting weavescope for container monitoring and managing.
Read More

Friday, June 5, 2020

Falco - Container Bahavior Analysis

End-to-End protection for containers in production is required to avoid the steep operational costs and also to decrease data breaches. New and Fresh Container attacks and Vulnerabilities continue to increase, a strong runtime security is required for containers.

Runtime container security means vetting all activities within the container application environment from analysis of container, runtime and host activities to monitoring protocols and payloads of network connections. Some of the vulnerabilities can be remediated by Host benchmarking and vulnerability scanning on Host Operating systems. Container images are scanned for vulnerabilities and remediation before running them but there is a need for analysis monitoring of the running containers. We need to understand what is happening within the running containers, what network calls are being made, what directories and drives are being accessed etc. It is very important to understand how the containers are behaving while running. This is where Container Runtime monitoring comes into picture and Falco is one such tool. In this blog we learn the basics of Falco tool and how that can be used.

Introducing Sysdig Falco 
Sysdig Falco is a Powerful behavioral activity monitoring tool to detect abnormal behavior in your applications and containers. Falco is cloud native runtime security systems that works with both containers and raw linux hosts. Developed by Sysdig organization for the Cloud Native computing foundation, it works by looking at the file changes, network activity, the process table and other data for suspicious behavior and then sending alerts through a pluggable backend. It inspects events at the system call level of a host through a kernel module or an extended BPF probe.

Falco works on rules that we can edit for identifying specific abnormal behaviors and it comes with 25 rules installed.

Installation and configuration
On a centos based machine, install the rpm as below,


Enable the repo using,
[root@ip-172-31-32-147]#dnf config-manager --enable epel

[root@ip-172-31-32-147]# rpm --import https://falco.org/repo/falcosecurity-3672BA8F.asc

[root@ip-172-31-32-147]# curl -s -o /etc/yum.repos.d/falcosecurity.repo https://falco.org/repo/falcosecurity-rpm.repo

[root@ip-172-31-32-147]# yum -y install kernel-devel-$(uname -r)
[root@ip-172-31-32-147]# yum -y install falco

Once the installation is done, a directory /etc/falco is created which contains 2 files
/etc/falco.yml,/etc/falco_rules.yml and /etc/falco/falco_rules.local.yml.

The file /etc/falco.yml controls several logging and high level configurations. 
The file /etc/falco_rules.yml contains the list of rules that can be configured for abnormal behavior checking.It contains a predefined set of rules designed to provide good coverage in a variety of situations.
The file /etc/falco/falco_rules.local.yml is an empty file with some comments. The intent is that additions/modifications/overrides to the main rules file are added to this file. This can be taught of a custom rules file for one organization.

Run the Service as,
[root@ip-172-31-32-147]# service falco restart

Writing Your First Rule
Falco rules are based on Sysdig filter syntax. These filters expose a variety of information about system calls and events that take place in the system. These filters are organized as classes called “field classes”.  These classes can be see running the “sysdig -l”. Some of the filters include 
Fd : file descriptors
Process : processes
Evt : System events
User : Users
Group : groups
Container : container info
K8s : kubernetes events

Falco Rules are written in YAML format with some required and optional keys. A simple syntax of a rule,
Rule        : Name of the rules
Desc        : Description of what the rule is
Condition : the logic that triggers a notification
Output     : message that will be shown in the notification
Priority     : logging level for the notification
Tags        : tags for categorize rules
Enabled   : turn the rule on or off
A simple falco rule for checking if a shell was triggered in a container

Rule 1 : Log if there is shell trigger in a Container
Create a rule as below,

- rule: Terminal shell in container
  desc: A shell was spawned by a program in a container with an attached terminal.
  condition: >
    spawned_process and container
    and shell_procs and proc.tty != 0
  output: "A shell was spawned in a container with an attached terminal (user=%user.name %container.info shell=%proc.name parent=%proc.pname cmdline=%proc.cmdline terminal=%proc.tty)"
  priority: NOTICE
  tags: [container, shell]

Now add the rules to the /etc/falco_rules.yml file and restart the Falco service. Now start a container and run bash inside the container as below,
[root@ip-172-31-32-147]#docker run -d -P --name example2 nginx
[root@ip-172-31-32-147]#docker exec -it example2 bash

Come out of the container and see the /var/log/messages file in the host machine. We can see the below type of logs

May 24 13:28:14 ip-172-31-32-147 falco[16586]: 13:28:14.523089250: Notice A shell was spawned in a container with an attached terminal (user=root example2 (id=1546ca8ce5f0) shell=bash parent=runc cmdline=bash terminal=34816)

May 24 13:28:23 ip-172-31-32-147 falco[16586]: 13:28:23.947776826: Warning Shell history had been deleted or renamed (user=root type=openat command=bash fd.name=/root/.bash_history name=/root/.bash_history path= oldpath= example2 (id=1546ca8ce5f0))

The log says that a shell is spawned in the container with an attached terminal. It also gives information about the user log triggered the shell and name of the container with container id. This way we can see what happens inside a container based on the rule that we defined.

Rule 2 : Check if other processes are running.
Docker best practices recommend running just one process per container. It can be a security issue if there are some other processes too running in a container. In our nginx container, we want only the nginx process to run. We want to log whatever process or job that run inside a nginx container other than nginx processes. Our rule would look like,

- rule: Unauthorized process on nginx containers
  desc: There is a process running in the nginx container that is not described in the template
  condition: spawned_process and container and container.image startswith nginx and not proc.name in (nginx)
  output: Unauthorized process (%proc.cmdline) running in (%container.id)
  priority: WARNING

Lets Understand the rule a little,
Spawned_process : a macro to identify that a new process was executed.
Container : the container namespace where it was executed belongs to a container and not the host
Container.image startswith nginx : the image name so you can have an authorized process lists for each one
not proc.name in (nginx) (the list of allowed processes names)

[root@ip-172-31-32-147]# docker run -d -P --name example2 nginx
[root@ip-172-31-32-147]# docker exec -it example2 ls

Run a nginx container and run “ls” inside the nginx container.Now when we check the /var/log/messages file, we can see the below logs as,

May 24 13:34:20 ip-172-31-19-104 falco[17179]: 13:34:20.823028587: Warning Unauthorized process (ls) running in (1546ca8ce5f0)
May 24 13:34:20 ip-172-31-19-104 dockerd[15797]: time="2020-05-24T13:34:20.876166289Z" level=error msg="Handler for POST /v1.39/exec/c4180687a5b2dc2b9d58b7e8ca20f5242e0b3a7657751b7a437645c012f2a67a/resize returned error: cannot resize a stopped container: unknown"

Though falco is a good tool for behavior checking, there are few limitations for the tool. Though it supports integrations with multiple tools , more work needs to be done on enhancing the tool. Hope this helps in starting with the Falco tool.
Read More

Containers Vs Pods

A Common confusion to most of the developers and administrators is the difference between a Pod and Container. We use the term container when using Docker and use the term pod with Kubernetes or openshift. So what exactly is the difference between a pod and a Container?

In simple terms, if you see the logo of docker we see a whale as below,
 
What are groups of whales called?, a Pod. If a single whale is called a container, multiple whales or containers are called pods. Though a pod contains multiple containers, the way they work in the pod is different. In this article, we will see what containers are and pods are?

Containers are not new 
Containers are not new atall. Docker is not the one who started the container revolution. The first of the container sort of implementations came with the OpenBSD operating system when they came up with the “Jails” Concept in 1999. Solaris introduced a Concept of “Zones” in around 2004. Then many other implementations came into picture. In 2006, Google came up with something called “process Containers”. Process Containers was designed for limiting, accounting and isolating resource usage (CPU, memory, disk I/O, network) of a collection of processes. It was renamed “Control Groups (cgroups)” a year later and eventually merged to Linux kernel 2.6.24. In 2013, google came up with a container stack called “LMCTFY” and Docker came into picture. Docker made the life of a developer easy to implement and run the containers in production.
 
How are containers Created?
Though container implementations are introduced by various organizations, the core components for creating the containers are available in the linux kernel itself. Using these core components we can create containers without using any container runtime. More over every container runtime like Docker, RKT etc that are available in the market now uses the same core components to create containers under the hood. The core components include Chroot, Namespaces, Cgroups, Capabilities and UnionFS. A detailed introduction about the components is provided in the “anatomy of containers” article. 

Containers are just like normal processes that run with some extra features of linux kernel called Namespaces and Cgroups. Namespaces attach a separate view of the system resources like process, Network, Hostname etc to processes that hide everything to other processes and external worlds. By this separate view, the processes will get their own execution environment to run. Namespaces include,
Hostname
Process Tree
File System
Network Interfaces
Inter-process communication

While Namespaces can’t allow processes to interface with other processes, the process can still access resources like Memory and CPU from the Host machine. There needs to be control of these host resources to containers. Cgroups are introduced to restrict Memory, CPU ,I/O and network from Host machine to containers. By default a Container will get unlimited resources from the Host machine until restricted.

Combining Everything
A Container when created will have these core components attached to that. Each of these core components have different functionality and can be attached or not attached to containers. Some containers can have few namespaces attached but not all. Similarly these core components can be attached to one or more processes. We can have multiple processes running with a single namespace. By attaching these core components to multiple processes we can extend their functionality. For example, if multiple processes are added with network namespace then both processes can communicate with each other as local processes. Similarly if two processes are attached with a Memory cgroup restriction, then both processes are restricted with memory.

For example, create a nginx container as below,
[root@ip-172-31-16-91]# docker run -d --name nginx -p 8080:80 nginx
Now start the second container by attaching some of the namespace components from the first container to the second as below,

[root@ip-172-31-16-91]# docker run -it --name centos --net=container:nginx --pid=container:nginx centos /bin/bash
[root@91202914ab48 /]# ps ux
USER PID %CPU %MEM VSZ RSS TTY STAT START TIME COMMAND
root 1 0.2 0.6 10624 6076 ? Ss 06:02 0:00 nginx: master process nginx -g daemon off;
root 34 6.0 0.3 12024 3356 pts/0 Ss 06:03 0:00 /bin/bash

[root@91202914ab48 /]# curl localhost:80


Welcome to nginx!


Welcome to nginx!


If you see this page, the nginx web server is successfully installed and
working. Further configuration is required.

For online documentation and support please refer to
nginx.org.

Commercial support is available at
nginx.com.

Thank you for using nginx.


[root@91202914ab48 /]# exit

If we can see the second container process, we see a Nginx process running. This way we have connected 2 containers with the same namespace. The second container has the same network and process tree namespace attached from the first container. Since we have the network namespace shared, the nginx process running on the first container can be accessed by using “localhost:80” from the second container.

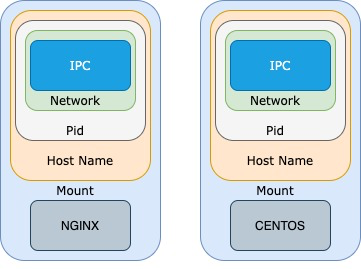
Generally when ever a container is created, we see the similar namespace settings as below,

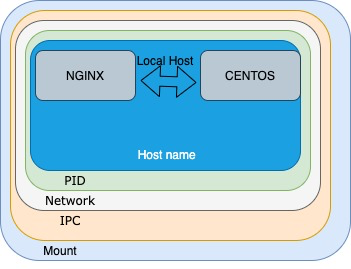
But when we have 2 containers with shared namespaces we can see both containers attached as below,

This is the same with Pods. Instead of creating multiple containers and running them on shared namespaces and cgroups, we create Pods with multiple containers. The orchestration platform that creates pods will take care of creating containers inside the pods with a shared model. The Orchestration platform like Kubernetes will take care of automating the creation of containers inside a pod with correct namespaces and cgroups set.

So What are pods anyway?
Pod is a group of one or more containers ( basically docker or rkt containers ) with shared storage/network and a spec file on how to run the containers inside the pod.

The containers inside the pod are always co-located and co-scheduled that run in a shared context. The containers running inside the pod can now talk with each other on a local host. The pod will be given a single IP address and all containers inside the pod will be accessed with the pod ip address.A Storage location attached to the pod can now be accessed by any number of containers inside the pod.

We can also think of a pod to be a single VM with one or more containers that have a single IP address and Port space. Containers inside the pod talk to each other on localhost since we have the same shared network space. They communicate with each other with standard inter-process communication systems. Contains inside the pod also have access to shared volumes, which are defined in the pod spec file. These volumes can be mounted to one or all containers running inside the pod by defining the mount options in the pod spec file.

Why Pods?
A Pod represents a Unit of deployment, a single instance of an application or multiple instances of different applications that are tightly coupled and that share resources. The “one-container-per-pod” model is the most common use case where you run one instance of your application in a container in a pod.

Multi-container model comes into picture when we have applications that are tightly integrated together. For example, we have a pod with 2 containers as below,

In the above image, we have a pod with shared volume and network. The volume is mounted to both containers “content puller application” and “web server”. The container “content puller” will pull content from the content management system and put it in the volumes. The web server container will pull the content from volume and will be displayed for users. Since these 2 containers are serving a single purpose of displaying the content to users, we can think of these multiple cooperating processes ( Containers ) a single unit of service.

Unit of deployment - Since multiple containers run in the pod they are treated as a single unit of deployment. Everything done on that pod will also work on the containers running inside the pod.

Management : Since multiple containers in pods represents a single unit of service, management, deployment can be very easy. Pods can now be easily deployed with multiple versions, horizontally scaled and replicated. Colocation (co-scheduling), shared fate (e.g. termination), coordinated replication, resource sharing, and dependency management are handled automatically for containers in a Pod

Ease of use : The orchestration platform takes care of running the pods with containers. We application developers don't need to worry about the container exit , signalling etc. When a pod goes down, the platform takes care of getting up the pod in a new machine including the containers and volumes attached as before.

If one of the containers in the pod goes down, the whole pod goes down making sure that the whole stack of applications are up or down at any point of time. Since the pods are scaled up and down as a unit, it is very important for the pod to be small. Since pods with multiple containers are scaled, every container inside is scaled regardless of the use. So make sure the pod is small and contains a single container until needed.
Read More

Sunday, May 24, 2020

Container Registries - A War

One of the main advantages of using containers is the continuous availability. Rather than taking the whole system down, the container running with micro service can be replaced on the fly. Developers usually prepare a new container image with the updated micro service and switch it with the existing image and a new version is up and running. 

It is always advisable to archive or store different versions of the image for safety reasons or for rollback purposes. But there can be a lot of different versions or tags of the same image available. This is when image registries or repositories come into picture.
 
Repository vs. Registry
Before we go and understand about container images and registries, it is important to understand the difference between a container registry and container repository. At the core both of them do the same job but with little differences.

A Container repository is used to store a collection of related images i.e. container manifests of the same name for setup and deployment. We can access the images from container repositories via secure HTTPs endpoints. We can perform various operations like push,pull or manage images.

A Container registry on the other hand stores a collection of repositories as well as indexes, access control rules , api paths etc. A Docker registry can be hosted by a third party,  as public or private registry like the following,
Docker hub
Quay
Google Container registry
Aws Elastic Container registry  or you can host the docker registry by yourself

Docker repository is a collection of different docker images with the same name, that have different tags. For example, if we see check the link “https://hub.docker.com/r/library/python/tags/”, there are many different tags of the official python image, these tags are members of the official python repository which are hosted by the Docker Registry.

Why Use a Container Image Registry ?
Developers run their code in physical or virtual machines by creating packages along with co-dependencies in unique versions for operating systems and machine variants. With the arrival of containers, things changed allowing developers to compose small, portable units called images that can be bundled with all necessary packages and their dependencies, run anywhere and be deployed using automation.

In the old model when a problem arises, developers were asked to analyze and patch a running system one at a time. In the new model of containers, developers continuously produce new container imaged versions to fix issues and add features. These newer versions of images flow into a pipeline and reside in a specialized cataloged storage and wait for further processing steps like vulnerability validation, image scanning and followed by a deployment.

The specialized cataloged storage is what we call as Image registry. During the entire process, the registry remains a source of truth for the images we want to run. The main advantage is that we have the container created with the same image running everywhere. 

Public vs Private Registries
Once we start using containers and images, the next question is to where we store our images. There are 2 options in this case, public and private registries.

Public Registries - public container registries are generally faster and easier to route when initiating a container registry. These registries are ideal for smaller teams and for applications that are less critical in the organization. The public registries provides some more additional facilities image scanning for vulnerabilities, webhooks ( trigger actions after a successful push to a repository to integrate docker hub with other services ), builds ( automatically build container images for source code repositories like Github and push then to docker hub). It also provides us various facilities to use official images as well as publisher images.

Private registries - when it comes to securing the code, we can’t keep the images in a public registry. A private registry is a container registry that is set up by the organization It teams. Private registries are either hosted or on-premise and are typically used by a larger organization or enterprise that is more set on using a container registry. Having complete control over the registry in development allows an organization more freedom in how they choose to manage it. This is why private registries are seen to be the more secure route when it comes to implementing a container registry, as an organization can apply as many security measures as they feel needed.

Security - Public Containers are seen as less secure because container images may contain malicious and outdated code which if unpatched could lead to attacks and data breaches. These images may also be unknown to who has read or write access to the image. This makes the need for private repositories in organizations. If security is the priority in an organization then the first move is to implement a private registry.

Available Players
There are many players in the Container registries currently. 

Docker Hub - Docker Hub is the most popular among the players. A standard for open source container images. It provides a free storage for your images and needs to take a premium if you want to hast internally. The premium also provides additional image scanning facilities to identify vulnerabilities in images. Other advantages with Docker hub is the ease of use and integration options. It also provides various facilities with the ability to automate things with Webhooks and Builds. The features are limited with Dockerhub when compared with other registries like Quay that offer comprehensive access management. Only supports docker images. Setting up Docker hub in house can require additional work like installing necessary dependencies beforehand. Another drawback when using DockerHub internally is that when harddisk fills up, it is very hard to manage and delete those unnecessary images.

Quay.io - A container registry from Redhat designed to offer enterprise level features. Besides basic container management , it also offers detailed access control, logging, auditing, comprehensive access management and additional security features. Quay also integrated with the open source container security scanning tool called clair. This helps in scanning images for vulnerabilities when the image is being pushed or pulled. The Notifications alert lets you know about vulnerabilities. Quay.io has a beautiful and easy to understand web based UI. 

HarborEntry of VMware into the container world provides some good tools for use. Harbor container registry is one such tool. This is an enterprise class registry server that stores and distributes container images. Harbor extends the open source Docker distribution by adding additional functionalities that enterprises need like security, identity and management with enhanced performance.


Harbor is an open source trusted cloud native registry project that stores, signs, and scans content. One of the best features of the Harbor registry is Garbage Collection. As we deal with multiple repositories and container images, there will be many images for different stacks like development, staging and production. Storing them without having any deletion strategy results in no space left on the host machine. Harbor provides a way to delete the image first which is soft deletion and finally when we need to run the garbage collector which will take care of cleaning up the disk space and links etc.


The mission of Harbor is to provide users in cloud native environments with the ability to confidently manage and securely serve container images. Here are some of the features of Harbor Registry,

Ability to scan and sign container Images

Multi tenant content signing and validation

Security and vulnerability analysis

Identity integration and role based access control

Image replication between instances

Extensible API and graphical UI

Internationalization (currently English and Chinese)

Audit Logging

Label management


A Harbor registry can be deployed as a stand alone registry by using Docker compose or using Helm Chart to a Kubernetes cluster.


Cloud based Registries - Another option for container registries are by using the cloud based registries from major players like Aws , Azure and Google cloud,
Aws Ecr ( Elastic Container registry ), Google Container registry and Azure Container registry are some of the options for hosting container images provided by Cloud platforms. All these registries integrate very well with other services of the respective cloud. Since all cloud platforms provide the Security services by default, access management facilities are by default available. These cloud registries also provide image scanning facilities, hooks to automate container deployments, build management, auditing and logging. Though some of these provide additional facilities like Azure managing network latency by leveraging its vast cloud computing network and making sure that the closest clusters are used and Gcp being the most affordable option on the market by paying only for the storage and bandwidth we use  and also image encryption.

Other types - Besides having public and  private repositories to store containers, we have other platforms available which can save not just container images but all other types of artifacts, archives and packages. If the organization purpose is not just to store container images but also to store code, java archives, python packages, operating system packages or other types of software we can go with Jfrog artifactory , sonatype nexus repository or cloudsmith package for storing any type of artifacts or packages.

Choosing a registry
Container registry comparison is a matter of understanding your platform and application requirements and finding the one that suits the needs best. Taking into account the cloud environment will help in choosing the best. 
With so many choices, here are few factors to consider while choosing a registry
  • Do we need an on-premises or hosted registry, some registries from cloud platforms only work with cloud based services, others can only run on local servers or on-premises.
  • Do you want to host things in addition to container images? Most container registries are designed for the sole purpose of hosting containers images. However, some, such as Artifactory, can host other types of files, too. The latter are a better fit if you’re looking to build a repository for more than just Docker images.
  • If security is a priority then we need to focus more on security focused registries like Flawcheck container registry or Quay registry.
  • Do you want tight integration with a particular container stack ?Container stacks like Openshift provides an internal , integrated container registry that can be used to store images though it supports external registries too.
  • Does the Registry be exposed on the Web where developers can use basic API ( REST ) based calls to perform or trigger actions on the Images.
  • Does the registry provide integration facilities like web hooks to trigger deployments when things changes
  • auditing facilities where all the operations to the repositories are tracked.
  • Graphical User Portal where users can easily browse, search repositories, and manage projects.
  • Image Authenticity facilities ,digital signing and content trust facilities - Content trust provides the ability to use digital signatures for data sent to and received from remote Docker registries. These signatures allow client-side verification of the integrity and publisher of specific image tags.
  • Image Deletion and Garbage Collection - Facilities to identify unused images, unreferenced layers in the images and cleaning them
  • Repository Replication - images replication to replicate repositories from one instance of registry to another and to other regions or locations
  • Label management - labels are used to isolate image resources globally or a project level.
  • Build file management - beside storing container images, it is often required to store the build file like Dockerfile, helm chart, or deploymentConfig along with image.
  • Role-Based Access Control: Users and repositories are organized into projects. Users can have different permissions for the images in different projects.
  • Integration with internal Authentication tools like Active directory or LDAP to allow people working in the organization perform actions on the registries or images.
  • Does it have Organization and teams support? So that each team has their own control over the images under that.
  • Does it support multiple storage models for use with the registries?
  • Does it have a facility to support faster downloads? For example redhat quay has BitTorrent downloads to decrease wait times.
More to Come, Happy Learning :-)
Read More

Sunday, June 30, 2019

Docker - Trapping Signals inside a Container

A signal is a message to a process from the kernel to notify that some condition has occurred. When a signal is issued to a process, the process is interrupted and a signal handler is executed. If there is no signal handler, the default handler is called instead.

A Docker container will also receive signals. In docker , we have two commands that we can use to stop it, docker stop and docker kill. When we do a docker stop to a running container, it sends a SIGTERM signal to the main process running inside the container ( pid 1 process ) and after a grace period it issues a SIGKILL to terminate the process. At this moment the process can ignore the signal or let a default action occur or provide a callback function to respond to the signal.

Lets run a container with the sleep command and try to pass a signal to the container as,
jagadishm@[/Volumes/Work/build/trap]: docker run -it centos sleep 100
^C^C

In this case, the container will not exit until the sleep 100 is complete which means the signal that we passed is not received by the container process.

Now let's write a simple bash trap script as below,

jagadishm@[/Volumes/Work/build/trap]: cat signal.py 
import signal
import sys

def signal_handler(sig, frame):
        print('You pressed Ctrl+C!')
        sys.exit(0)

signal.signal(signal.SIGINT, signal_handler)

while True:
    print('Press Ctrl+C')
    signal.pause()
    time.sleep(10) #make function to sleep for 10 seconds

This script goes to infinite sleep mode but it has the trap command which handles the signals that we pass. Lets create a docker image trap with the below contents,

jagadishm@[/Volumes/Work/build/trap]: cat Dockerfile 
FROM centos
COPY signal.py /
WORKDIR /
ENTRYPOINT ["python”,”signal.py”]

Now when we run the container and try to send the signal “ctrl + c “ as below,
jagadishm@[/Volumes/Work/build/trap]: python signal.py 
Press Ctrl+C
^CYou pressed Ctrl+C!

We can see that the signal is sent to the process and even handled by the trap expression by executing the commands defined. One the above container is up and running ,from another terminal window run the “docker kill --signal

Signal by Docker - Similarly Docker allows to send signals to the process running inside them. Signals can be sent by stop,rm and kill commands in docker.

By Stop - Docker stop command allows to send a stop signal to the process running inside it. When we issue a stop command, the process will be asked nicely to stop and if it doesn’t respond in 10 seconds it will forcibly kill it. The docker stop command attempts to stop a running container first by sending a SIGTERM signal to the root process ( ie. process running with pid 1). If the process hasn't exited within the timeout period a SIGKILL signal will be sent.

The only thing that we can control with the stop command is the time to wait until the docker daemon will wait before sending a SIGKILL. A stop command with the time can be defined as “docker stop ----time=30 <Container ID>

By Kill - Similarly we can send the signal by using the docker kill command. The main process inside the container is sent a SIGKILL signal ( default ) , or a signal that is specified with the --signal option. 

The --stop-signal flag sets the system call signal that will be sent to the container to exit. The signal can be a valid number that matches a position in the kernel syscall table for instance 9, or by a signal name SIGNAME for instance SIGINT.

From the first terminal run the command “docker run -it trap /bin/bash” as below
jagadishm@[/Volumes/Work/build/trap]: docker run -it trap /bin/bash
Press Ctrl+C

Now from another terminal window, run the command “docker kill --signal="SIGINT" <Container ID>” . once we pass the SIGINT signal to the container, we can see the below output,
jagadishm@[/Volumes/Work/build/trap]: docker run -it trap /bin/bash
Press Ctrl+C
You pressed Ctrl+C!

By RM - docker rm command is used to remove already stopped container but when used in conjunction with --force flag a SIGKILL is passed to the pid 1 inside the container. It can be used as “docker rm --force <Container ID>

Hope this helps in understanding how to pass signals to a container and define a shutdown behavior for the process running inside the container.
Read More